Tag Archives: ASM

Oracle Database 12c on Oracle Linux 6 – Step 16: Configure ASM and Create the 13 ASM Disks

Part of this series of posts: Oracle Database 12c on Oracle Linux 6

16-01

Type the following command and press Enter.

oracleasm configure -i

Type oracle at the Default user prompt and press Enter.
Type dba at the Default group prompt and press Enter.
Type y at the Start Oracle ASM library driver on boot prompt and press Enter.
Type y at the Scan for Oracle ASM disks on boot prompt and press Enter.

Note:

You don’t have to be in the Desktop directory to run the above command, it will work from anywhere.

16-02

Enter the following commands pressing Enter after each line.

oracleasm init
oracleasm createdisk ASMDISK01 /dev/sdb1
oracleasm createdisk ASMDISK02 /dev/sdc1
oracleasm createdisk ASMDISK03 /dev/sdd1
oracleasm createdisk ASMDISK04 /dev/sde1
oracleasm createdisk ASMDISK05 /dev/sdf1
oracleasm createdisk ASMDISK06 /dev/sdg1
oracleasm createdisk ASMDISK07 /dev/sdh1
oracleasm createdisk ASMDISK08 /dev/sdi1
oracleasm createdisk ASMDISK09 /dev/sdj1
oracleasm createdisk ASMDISK10 /dev/sdk1
oracleasm createdisk ASMDISK11 /dev/sdl1
oracleasm createdisk ASMDISK12 /dev/sdm1
oracleasm createdisk ASMDISK13 /dev/sdn1

Note:

The up arrow is your friend. After running each command use the up arrow and you can change the last letter and then use the arrow keys to move back to the disk name and change that too. You don’t have to move your cursor to the end of the line before you press Enter. The command will run no matter where your cursor is when you press Enter.
If you see any errors when entering the above commands, there’s a good chance you forgot to type oracleasm init before you created the disks.

Oracle Database 12c on Oracle Linux 6 – Step 15: Format the 13 Linux Disks using the Linux Disk Utility < Previous Post – Next Post > Oracle Database 12c on Oracle Linux 6 – Step 17: Create the Directories for Installing Oracle Software


Oracle Database 12c on Oracle Linux 6 – Step 15: Format the 13 Linux Disks using the Linux Disk Utility

Part of this series of posts: Oracle Database 12c on Oracle Linux 6

15-01

Select Applications -> System Tools -> Disk Utility from the menu bar.

15-02

Select the 2nd drive (/dev/sdb) and click Create Partition.

Note:

You’re looking for the 2nd drive under the SATA Host Adaptor. When you select it you’ll see /dev/sdb in the Device: field (highlighted yellow and pointed to by the yellow arrow).

Update:

It appears that the latest version of Oracle Linux 6 (6.5) has changed the above UI a bit. You’ll have to use the Format Drive button and choose Master Boot Record in order for the Create Partition button to appear.

15-03

Type ASMDISK01 and uncheck the Take ownership of filesystem box and click Create.
Do this for ALL of the ASM disks, incrementing the name from ASMDISK01 through ASMDISK13.

Note:

If you forget which disk you are creating (disk partition creation takes a while) just look at the Location field. Decrement the port number by one to get the correct ASMDISK number. For example; If it reads Port 10 of SATA Host Adapter, then you are on ASMDISK09. I highlighted the Location field in the above screen shot.

15-04

Once you are finished with all 13 ASM disks, Select File -> Quit to exit the Disk Utility.

Oracle Database 12c on Oracle Linux 6 – Step 14: Download, Configure and Install rlwrap < Previous Post – Next Post > Oracle Database 12c on Oracle Linux 6 – Step 16: Configure ASM and Create the 13 ASM Disks


Oracle Database 12c on Oracle Linux 6 – Step 11: Download and Install Oracle ASMLib

Part of this series of posts: Oracle Database 12c on Oracle Linux 6

11-01

Click the Firefox icon in the menu bar to open a web browser window.

11-02

Use google to search for oracle linux 6 asmlib and click the Oracle ASMLib Downloads for Oracle Linux6 link.

11-03

Scroll down and click the link in the Library and Tools box.

Note:

The version number of the link could be slightly different if updates have been made.
As of this install it was oracleasmlib-2.0.4-1.el6.x86_64.rpm.

11-04

Click OK to open the rpm with the Package Installer.

11-05

Click Continue Anyway.

11-06

Click Install.

Oracle Database 12c on Oracle Linux 6 – Step 10: Download and Install Oracle ASM Support Packages < Previous Post – Next Post > Oracle Database 12c on Oracle Linux 6 – Step 12: Download and Install the Oracle 12c Pre-Install Package


Oracle Database 12c on Oracle Linux 6 – Step 10: Download and Install Oracle ASM Support Packages

Part of this series of posts: Oracle Database 12c on Oracle Linux 6

10-01

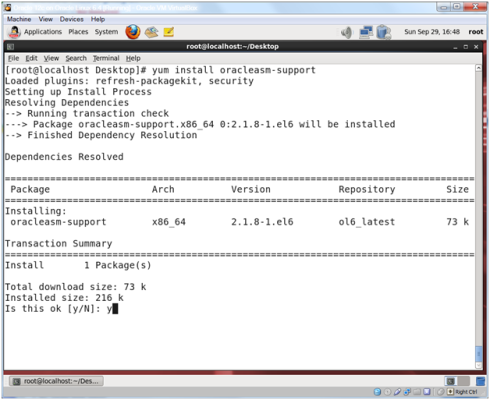
Type the following command and press Enter.

yum install oracleasm-support

10-02

Type y at the Is this ok [y/N]: prompt and press Enter.

Eventually you’ll see a Complete!

Oracle Database 12c on Linux 6 – Step 9: Download and Install Kernel, GCC, and Readline Packages < Previous Post – Next Post > Oracle Database 12c on Oracle Linux 6 – Step 11: Download and Install Oracle ASMLib


Using Oracle VirtualBox to create an Oracle Education classroom environment

Update from April 2014: This post has been superseded by this post: Oracle Database 12c on Oracle Linux 6


I created this blog last year so I could write down the steps taken to create an Oracle Education classroom environment using Oracle VirtualBox. I teach Oracle Education classes for Austin Community College (ACC) and also for RFD & Associates, Inc. under a program called the Workforce Development Program. You can see my previous blog post for a description of the Workforce Development Program. Tomorrow I’m teaching a class at ACC to do all of the below with my students from the DBA I and DBA II courses plus a special guest, so I thought it was finally time to start getting this all down.

There are a number of steps to create the classroom environment. Over the next few weeks I intend to write a post for each of the steps. As each post is written, I’ll update each step in the list below to point to those posts.

Here’s the steps that I took to create the classroom environment:

  1. Download and install Oracle VirtualBox including the Extension Pack.
  2. Download the Oracle Linux ISO from edelivery.oracle.com/linux.
  3. Create a virtual machine running Oracle Linux.
  4. Create a local yum repository from the DVD content and add asmlib downloaded from linux.oracle.com.
    While you could just use an online repository instead of a local repository, the local repository allows you to install RPMs even if you are not connected to a network. I find this is nice from time to time, and we are more worried about the Oracle Database than we are about having the most up to date Linux environment.
  5. Install asmlib, asmsupport, and the oracle-validated RPMs and create the required directories including a stage directories for Oracle Grid Infrastructure and Oracle Database.
    We’re also going to make the Linux User IDs and Group IDs match the training material.
  6. Install Oracle VirtualBox Guest Additions.
  7. Install rlwrap.
    Optional, but oh so nice.
  8. Create the ASM disks and then configure and start ASM.
  9. Configure the Oracle user’s environment including a really nice login.sql script.
  10. Download Oracle Grid Infrastructure and Oracle Database 11g R2.
  11. Install Oracle Grid Infrastructure and create a +FRA (Fast Recovery Area) disk group in addition to the +DATA disk group.
  12. Install the Oracle Database software.
  13. Use the Database Creation Assistant to create a Database instance.

If you follow the above steps, you’ll have a training environment that matches the Oracle training material for the majority of  the Oracle Database Administrator training classes (but not all, for instance the Real Application Clusters or RAC class is obviously a bit different).


Thoughts on my install of Oracle Restart, Oracle Automatic Storage Management and Oracle Database 11g R2 on 64 bit Windows 2008

Last week I spent some time with a client installing Oracle on their production servers. I’ve done lots of installs using Unix/Linux, but it had been a long time since I had done anything on Windows. Windows is supposed to be a whole lot easier than Linux, right?

We started by formatting the database storage disks into two sections, using the inner cylinders for our planned Fast Recovery Area (+FRA) and then the outer cylinders for the database data files (+DATA). Of course we formatted the disks and gave them nice descriptive names, only to find out later that although you format the ASM disks on Linux/Unix, you don’t format them on Windows. Windows wants raw disks. Which makes sense because NTFS really isn’t the greatest…

Once we finished formatting the disks the correct way, we went ahead and created the oracle user and added oracle to the Administrators group. We then installed the Grid Infrastructure and created the DATA disk group for ASM. Once the install was finished we went ahead and added the FRA disk group. With everything in place, the next step was to install the database.

There were two tricks during the database install, one we found by reading the release notes and install documentation, and the other we ended up not discovering until the next day. The first trick is that even though the oracle user was a member of the Administrators group, you should still right click on the cmd.exe icon and choose Run as administrator from the context menu. Everything progressed along nicely until we go to the portion where the Database Configuration Assistant tried to create the database. DBCA gave us the following warning:

Database Configuration Assistant: Warning
PRCR-1006: Failed to add resource ora.orcl.db for null
PRCR-1071: Faild to register or update resource ora.orcl.db
CRS-0245: User doesn't have enough privilege to perform the operation.

That seems strange… oracle is a member of the Administrators group and we started dbca from an Administrative command prompt, why are we getting this warning? It doesn’t look like a good warning, but it was just a warning, so let’s continue and see what happens… After a few more warnings dbca completed, but it was obvious that the installation didn’t work correctly. We used the new oracle deinstall command for Windows and gave the install another shot, only to run into the same errors. This time we decided to see what Google had to say. Searching for those errors didn’t turn up much help in the Windows world. Most folks who have seen those errors before were using Linux and they were having problems with the required groups. Nobody else seemed to be running into those errors on Windows… After asking around a bit and doing some more searching, we decided to take a step back and review everything to make sure we on track. Step 1: Make sure oracle is in the Administrators group. Imagine our surprise to find out that oracle wasn’t a member of Administrators! I was positive that we’d done this first thing in the morning, but apparently we hadn’t. Did I click Cancel instead of OK or something? Who knows… but at least we figured out why the install was working. After adding oracle (back?) into the Administrators group, everything worked just fine. We finished up the install and started getting the database ready for the migrated content from the old system which took us to the end of the day.

The next day we logged into Enterprise Manager Database Control (EM) and attempted to create some export directories using EM. We’d already stored the credentials for the oracle user in EM but for some reason they were no longer working. That’s strange, why not? It was working just fine yesterday… We did some testing and found out that we could configure EM with a different Administrator account and things would work, but not oracle. What was going on? It didn’t make any sense at all! OK: Start at the beginning. Step 1: Check to make sure that oracle is a member of the Administrators group. This time I have to say that I wasn’t as surprised as I was the first time when I saw that oracle was no longer a member of the Administrators group, but I was still curious as to what was happening. I turned to the network administrator only to see a very sheepish grin on his face. It turns out that the organization had configured a domain rule to remove administrator privileges from unknown users. This would run a couple of times a day and we had run into in the middle of the day during our first install and again on our second day. Once we fixed this by adding oracle to the list of known administrators, everything worked just fine again.

So, lessons learned:

  1. ASM on Windows uses raw storage.
  2. Run your cmd commands as administrator.
  3. Make sure there are no funky domain rules to remove administrator privileges from oracle!

My hope is that the next person who runs into this on Windows finds this post. Maybe not… but at least I’ll never forget as writing the blog post and having the experience of the install gives me a better chance of remembering this in the future.