Tag Archives: Database Install

Oracle Database 19c Release Notes Doc Bug (Jan 2024)

What DALL-E thinks “Oracle Database Release Notes Documentation Bug” looks like

Update: In Feb 2024 Oracle updated the release notes to fix most of the below! They still have the un-needed export of the CV_ASSUME_DISTID, but they did add the steps about patching with the 19.22 patch during install and updating opatch. Thanks!

In January 2024, Oracle released a new version of the Oracle 19c release notes. They also released the 19.22 patchset for Oracle Database. The great news is that with the 19.22 release, Oracle has finally got the Oracle Database on-premises install on Oracle Linux 9 stuff knocked out. It works ‘out of the box’ now. However, if you look at the release notes and navigate to the section entitled “Known Issues and Bugs for Oracle Linux 9 and Red Hat Enterprise Linux 9“, and then navigate to the 19.22 subsection, you’ll see this:

And, well… It’s not really that simple. If you didn’t have 35 years of experience reading Oracle release notes, you might take that statement at face value. Things won’t go well for you if you did. Instead, you have to peer up at the 19.21 section to see the following steps (but of course you are installing 19.22, not 19.21, so you don’t need to pay attention to that section, right?):

Single-instance Oracle Database (19.21):

  1. Set the environment variable CV_ASSUME_DISTID to OL8 ($export CV_ASSUME_DISTID=OL8).
  2. Unzip the 19.3.0.0.0 Oracle Database gold image.
  3. Copy the OPatch utility version 12.2.0.1.40 or later from My Oracle Support patch 6880880 by selecting the 19.0.0.0.0 release.
  4. Install Single-instance Oracle Database with $ 19.3 on-prem_db_ image/runInstaller -applyRU <19.21 DBRU Patch 35643107 location> -applyOneOffs <19.21 MLR 35954820,19.21 OCWMLR patch 36022515 location>

That’s quite a bit different than the 19.22 section that says “No additional patches are required for installing Oracle Database 19c Release 19.22 on Oracle Linux 9 or Red Hat Enterprise Linux 9“.

Having just done a lot of testing of this on Oracle Linux 9, here’s what (in my opinion) the release notes should actually say in the Single-instance Oracle Database (19.22) section:

Single-instance Oracle Database (19.22):

  1. Unzip the 19.3.0.0.0 Oracle Database gold image to your ORACLE_HOME location (for example /u01/app/oracle/product/19.0.0.0/dbhome_1).
  2. Download the OPatch utility version 12.2.0.1.40 or later from My Oracle Support patch 6880880 by selecting the 19.0.0.0.0 release.
    $ cd /u01/app/oracle/product/19.0.0.0/dbhome_1
    $ rm -rf OPatch
    $ unzip -q /usr/local/src/oracle/patch_downloads/p6880880_122010_Linux-x86-64.zip
  3. Install Single-instance Oracle Database with
    $ /u01/app/oracle/product/19.0.0.0/dbhome_1/runInstaller -applyRU <19.22 DBRU Patch 35943157 location> -applyOneOffs <19.22 OCW Patch 35967489,19.22 OJVM Patch 35926646 location>

Some things to note:

  • With 19.22 you don’t need to modify the $ORACLE_HOME/cv/admin/cvu_config file or export the CV_ASSUME_DISTID environment variable to get the install to work correctly.
  • Even though you can now select the 19.0.0.0.0 “Release” of OPatch, you’ll actually get a version that is 12.X (see image below).
  • The OJVM patch is optional, but I like to see my opatch lspatches command look very clean (see below).
$ opatch lspatches

35926646;OJVM RELEASE UPDATE: 19.22.0.0.240116 (35926646)
35967489;OCW RELEASE UPDATE 19.22.0.0.0 (35967489)
35943157;Database Release Update : 19.22.0.0.240116 (35943157)

I’ve asked Oracle Support to log a doc bug against the release notes, once I get the bug number I’ll update this post with it.

Good luck with your 19.22 on Oracle Linux 9 installs!


Helping others

Part of this series of posts: Oracle Database 12c on Oracle Linux 6

One of my students at ACC suggested that I put this document up for sale on Amazon.

Instead I’ve decided to do the following:

  • Please consider opening an account on Kiva.Kiva is a non-profit organization with a mission to connect people through lending to alleviate poverty. Leveraging the internet and a worldwide network of microfinance institutions, Kiva lets individuals lend as little as $25 to help create opportunity around the world.If you use the below link you can get $25 to lend to others to get you started. I’ll also get $25 to lend to others. Technically the $25 to lend is a limited time offer, so you and I may not get this ‘bonus’ money to lend.http://www.kiva.org/invitedby/richard4068


I couldn’t have done it without you… < Previous Post


I couldn’t have done it without you…

Part of this series of posts: Oracle Database 12c on Oracle Linux 6

I made this document because I’ve seen folks struggle with some of the concepts in the document. Of course this document wasn’t created in a vacuum. Various blogs, the Oracle forums, a ton of Google searches and a lot of trial and error went into this document. To those that helped me in some way with the content in this document, thanks!


Oracle Database 12c on Oracle Linux 6 – Step 31: Enjoy a frosty beverage! < Previous Post – Next Post > Helping others


Oracle Database 12c on Oracle Linux 6 – Step 31: Enjoy a frosty beverage!

Part of this series of posts: Oracle Database 12c on Oracle Linux 6

31-01

If you’ve made it this far, congratulations! Open a frosty beverage of choice and pat yourself on the back. You deserve it!


Oracle Database 12c on Oracle Linux 6 – Step 30: Install the VirtualBox guest additions in the VM < Previous Post – Next Post > I couldn’t have done it without you…


Oracle Database 12c on Oracle Linux 6 – Step 30: Install the VirtualBox guest additions in the VM

Part of this series of posts: Oracle Database 12c on Oracle Linux 6

30-01

Select Devices -> Install Guest Additions… from the VirtualBox menu. You’ll have to use the right Ctrl key to release the mouse to do so.

30-02

Click Cancel.

30-03

Right-click the desktop and select Open in Terminal.

30-04

Type the following commands, pressing Enter after each.

su - 
root (at the Password: prompt)
export KERN_DIR=/usr/src/kernels/`uname –r`
cd /media/V [TAB]
./VBoxLinuxAdditions.run

Note:

Those are back ticks which are probably next to the 1 key on your keyboard, not forward ticks in the export command. The Tab key will autocomplete commands for you. When we type cd /media/V the shell will complete the name of the Virtualbox Guest Additions CD for you. It’s much easier than typing it. If you’d like to use the Tab key to autocomplete the second command, you’ll have to type up to the L in Linux before it will work because there are other commands in that directory that start with VBox. You can always hit the Tab key twice to see what the shell will be able to autocomplete based on your search path.

30-05

You should see output with all green OKs.

Note:

If you get a failed message it’s most probably because your kernel doesn’t match the kernel sources which usually means that your yum update kernel-uek-devel command from earlier didn’t work correctly. Recheck your commands from Step 9 to make sure you did everything correctly.

30-06

Select System -> Log out oracle… from the menu.

30-07

Click Log Out.

30-08

Press Enter and type oracle in the Password field.

30-09

Right click the Guest Additions CD and select Eject.

30-10

Your window should now resize to fill the whole screen!

Note:

We could actually do this step a lot earlier and get the nice widescreen if we want. It was just a bit harder to do screen captures for me so I stuck this at the end. This must be done AFTER the reboot in step 18 though…

Oracle Database 12c on Oracle Linux 6 – Step 29: Create a Link to SQL Developer and Database Connections < Previous Post – Next Post > Oracle Database 12c on Oracle Linux 6 – Step 31: Enjoy a frosty beverage!


Oracle Database 12c on Oracle Linux 6 – Step 29: Create a Link to SQL Developer and Database Connections

Part of this series of posts: Oracle Database 12c on Oracle Linux 6

29-01

Enter the following commands pressing Enter after each one.

cd $ORACLE_HOME
cd sqldeveloper/
./sqldeveloper.sh 

29-02

Click the small x in the top right hand corner of the Tip of the Day dialog.

29-03

Click the New Connection button.

29-04

Enter orcl – sys for Connection Name.

Enter sys for Username.

Enter oracle_4U for Password.

Check Save Password.

Select SYSDBA in the Role dropdown.

Change the SID to orcl.

Click Test.

Click Save.

29-05

Change Connection Name to pdborcl – system.

Change Username to system.

Change the Role dropdown to default.

Choose Service name and enter pdborcl.localdomain.

Click Test.

Click Save.

Click Cancel. (The connection dialog will go away.)

29-06

Select File -> Exit.

29-07

Right-click the banner at the top of the window and select Add to Panel…

29-08

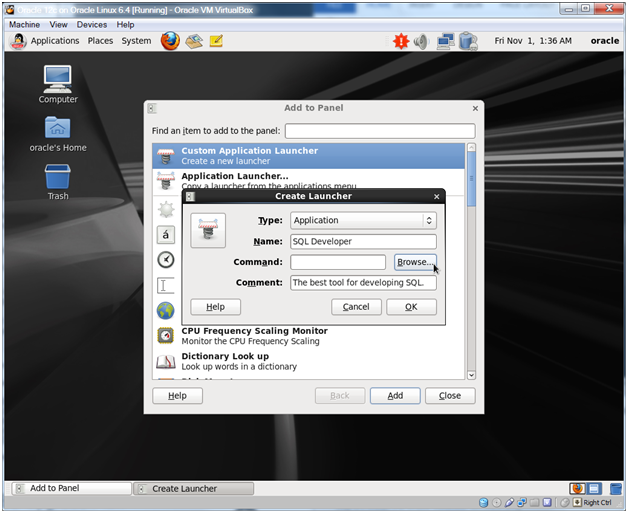
Select Custom Application Launcher and click Add.

29-09

Enter SQL Developer for Name.

Enter The best tool for developing SQL for Comment.

Click Browse…

29-10

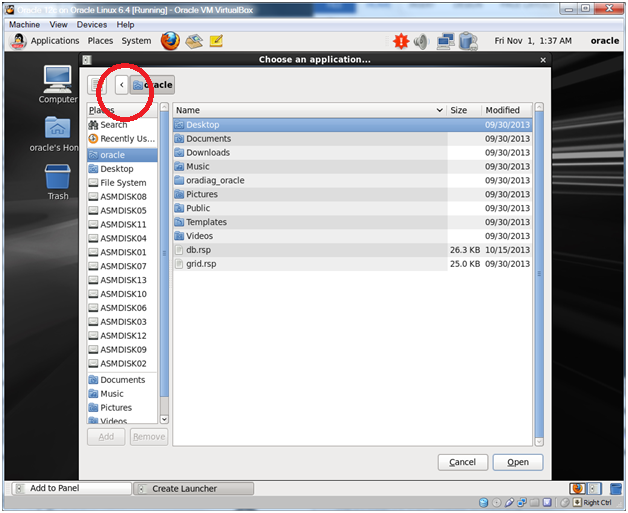
Click the left arrow next to the oracle folder.

29-11

Click the disk icon to get to the root directory.

29-12

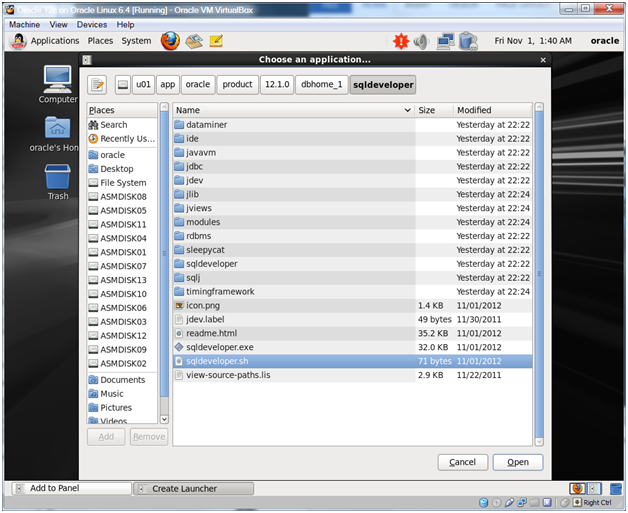
Keep clicking folders until you have navigated to /u01/app/oracle/product/12.1.0/dbhome_1/sqldeveloper.

Select sqldeveloper.sh and click Open.

29-13

Click the Launch icon.

29-14

Navigate to /u01/app/oracle/product/12.1.0/dbhome_1/sqldeveloper again.

Select icon.png.

Click Open.

29-15

Click OK.

29-16

Click Close.

Oracle Database 12c on Oracle Linux 6 – Step 27: Configure the Pluggable Database to Autostart on Reboot < Previous Post – Next Post > Oracle Database 12c on Oracle Linux 6 – Step 30: Install the VirtualBox guest additions in the VM


Oracle Database 12c on Oracle Linux 6 – Step 28: Log into Oracle Enterprise Manager Express

Part of this series of posts: Oracle Database 12c on Oracle Linux 6

28-01

Click the Firefox icon in the menu bar.

28-02

Navigate to https://localhost:5500/em .

28-03

Click I Understand the Risks.

28-04

Click Add Exception….

28-05

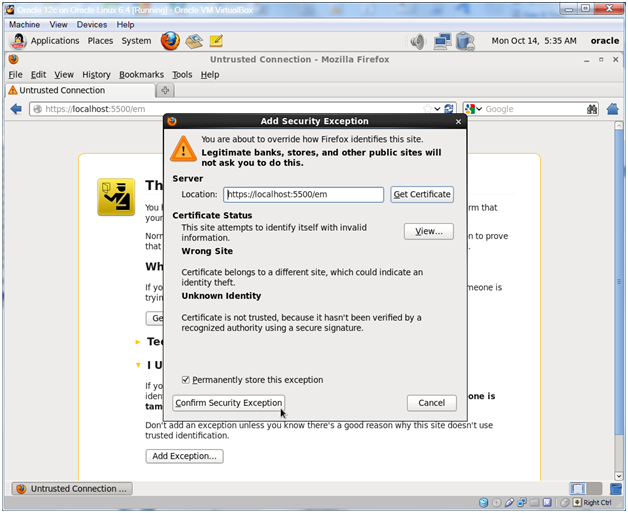
Click Confirm Security Exception.

28-06

Select Edit -> Preferences, click Use Current page, and click Close.

28-07

Enter sys for User Name, oracle_4U for Password, check as sysdba and click Login.

28-08

Note:

For some reason the lower windows seem to error out…

28-09

Again… Errors.

Oracle Database 12c on Oracle Linux 6 – Step 27: Configure the Pluggable Database to Autostart on Reboot < Previous Post – Next Post > Oracle Database 12c on Oracle Linux 6 – Step 29: Create a Link to SQL Developer and Database Connections


Oracle Database 12c on Oracle Linux 6 – Step 27: Configure the Pluggable Database to Autostart on Reboot

Part of this series of posts: Oracle Database 12c on Oracle Linux 6

27-01

Right-click the desktop and select Open in Terminal.

27-02

Type the following command and press Enter.

sqlplus / as sysdba

27-03

Type the following lines, pressing Enter after each one. The last line is a backslash, /. As you press enter after each line the prompt will change to show you your current line number.

create or replace trigger autostart_pdb
after startup on database
begin
execute immediate ‘alter pluggable database all open’;
end autostart_pdb;
/
  

Note:

For some reason pluggable databases don’t automatically start on reboot. Our container database (orcl) does as it is registered with Oracle Restart dynamically as it is created. The above trigger will automatically start our pluggable database (pdborcl) when the orcl database starts.

27-04

Type the following command and press Enter.

exit

Oracle Database 12c on Oracle Linux 6 – Step 26: Modify glogin.sql < Previous Post – Next Post > Oracle Database 12c on Oracle Linux 6 – Step 28: Log into Oracle Enterprise Manager Express


Oracle Database 12c on Oracle Linux 6 – Step 26: Modify glogin.sql

Part of this series of posts: Oracle Database 12c on Oracle Linux 6

26-01

Type the following commands, pressing Enter after each command.

cd $ORACLE_HOME
cd sqlplus/admin/
gedit glogin.sql

26-02

The previous command will open the existing glogin.sql script.

26-03

Add the below lines to the glogin.sql file and then click Save.

set trimspool on
set long 5000
set linesize 100
set pagesize 9999
col table_name for a30
column global_name new_value gname
set termout off
define gname=idle
SELECT LOWER(user) || '@' ||
              SUBSTR ( global_name, 1, decode (dot, 0, length(global_name), dot-1)) 
             as global_name 
    from
             (select global_name, instr(global_name,'.') as dot from global_name );
set sqlprompt '&gname> '
set termout on

26-04

Select File -> Quit.

2016-02-15 Update: Laurent Schneider (laurentsch via twitter) suggested adding the col table_name for a30 which is always useful…

2015-04-10 Update:

While the above glogin.sql is really cool, it does have the side effect of not allowing Enterprise Manager Cloud Control 12c (12.1.0.4 at least) to start the database. It appears that the select statement (which of course errors out when the database is down, but since we turned off terminal output with the ‘set termout off’ and then back on with the ‘set termout on’ it really shouldn’t make a difference…) breaks EM. I’ve asked Oracle to log a bug on this.

2016-02-05 Update:

Very cool! I just tested this out with Enterprise Manager 13c and it’s fixed. I’ve got a login.sql (instead of glogin.sql) and a SQLPATH environment variable that points to it and was just able to start my database with EMCC 13c. Thanks Oracle!

Oracle Database 12c on Oracle Linux 6 – Step 25: Create the orcl and pdborcl databases < Previous Post – Next Post > Oracle Database 12c on Oracle Linux 6 – Step 27: Configure the Pluggable Database to Autostart on Reboot


Oracle Database 12c on Oracle Linux 6 – Step 25: Create the orcl and pdborcl databases

Part of this series of posts: Oracle Database 12c on Oracle Linux 6

25-01

Open a new terminal window by right-clicking the desktop and select Open in Terminal.

25-02

Type the following command and press Enter.

dbca

25-03

The installer will start after a while (Java has to start up on the machine).

25-04

Click Next.

25-05

Choose Advanced Mode and click Next.

Note:

If you don’t want to install the sample schemas then you can just create a database with the default configuration, however do make sure to change the default character set to AL32UTF8.

25-06

Click Next.

25-07

Enter orcl.localdomain for Global Database Name. This will auto populate orcl for the SID.

Check Create As Container Database and enter pdborcl for PDB Name.

Click Next.

Note:

If you are in my Oracle Database 11g Admin I or II course at Austin Community College and you are using 12c for your own test server at home, you may want to skip the pluggable database part and just stick with a ‘regular’ orcl instance so your environment matches the Oracle training materials more closely. If so, don’t check the Create As Container Database check box.

25-08

Click Next.

25-09

Choose Use the Same Administrative Password for All Accounts and enter oracle_4U for Password and Confirm Password.

Click Next.

25-10

Click Next.

Note:

Our ASM listener (notice LISTENER is in the grid home) supports dynamic instance registration.

25-11

Change both Storage Type dropdowns to Automatic Storage Management.

Change Database File Locations from +FRA to +DATA.

Change Fast Recovery Area from +DATA to +FRA.

Click Next.

Note:

In any type of production situation you’d be enabling archiving. However since this is a learning environment we’re going to leave that unchecked for now.

25-12

Check Sample Schemas and click Next.

25-13

Confirm that Use Automatic Memory Management is checked. Enter 2048 for the Target database memory. Don’t click next, but instead click the Character sets tab.

Note:

Why so little memory? Two reasons: First, this is just a test or classroom system. Second, if the memory size is too large then you’ll get an error because /dev/shm will need to be resized to potentially fit the amount of memory allocated to Oracle. For very large amounts of memory you’ll want to look into enabling HugePages on Linux which means that you won’t be able to use Automatic Memory Management (AMM).

25-14

On the Character sets tab, choose Use Unicode (AL32UTF8) and click Next.

Note:

These days Unicode should be used for your Oracle databases. Oracle is requiring Unicode for some products and Java applications use Unicode natively so you won’t have to do character set conversions between the database and your application if you use Unicode.

25-15

Click Next.

25-16

Click Finish.

25-17

The installer will run for a while…

25-18

Click Exit.

25-19

Click Close.

Oracle Database 12c on Oracle Linux 6 – Step 24: Install the Oracle Database Software Only < Previous Post – Next Post > Oracle Database 12c on Oracle Linux 6 – Step 26: Modify glogin.sql