Tag Archives: Database Install

Oracle Database 12c on Oracle Linux 6 – Step 14: Download, Configure and Install rlwrap

Part of this series of posts: Oracle Database 12c on Oracle Linux 6

14-01

Re-open your web browser, use google to search for rlwrap and click the RL wrap – Utopia.ision.nl link.

14-02

Click the rlwrap-0.40.tar.gz link.

Note:

rlwrap was upgraded to 0.40 after I did this guide (the images show 0.37). You should use whatever version is available and then modify the commands below to use that version.

14-03

Click OK to open the file with the Archive Manager.

14-04

Click Extract.

14-05

Click Extract.

14-06

Click Close.

14-07

Go back to your terminal window and type the following commands, pressing Enter after each command.

cd /root/rlwrap-040/
 ./configure

Note:

Make sure you put the period in front of the / for the configure command. And again, use the actual version numbers that you downloaded.

14-08

Type the following command and press Enter.

make && make install

Eventually you will see a make[1]: Leaving directory `/root/rlwrap-0.40'

Note:
Again, the version will be the version you downloaded.

Oracle Database 12c on Oracle Linux 6 – Step 13: Reset the oracle Users Password < Previous Post – Next Post > Oracle Database 12c on Oracle Linux 6 – Step 15: Format the 13 Linux Disks using the Linux Disk Utility


Oracle Database 12c on Oracle Linux 6 – Step 13: Reset the oracle Users Password

Part of this series of posts: Oracle Database 12c on Oracle Linux 6

13-01

Type the following command and press Enter.

passwd oracle

Then type oracle at the New password prompt and press Enter (you’ll get the above warnings). Type oracle at the Retype new password prompt and press Enter.

Note:

See the note on Joes in the introduction. Your oracle user password should never be oracle if you care about the security of your system.

Oracle Database 12c on Oracle Linux 6 – Step 12: Download and Install the Oracle 12c Pre-Install Package < Previous Post – Next Post > Oracle Database 12c on Oracle Linux 6 – Step 14: Download, Configure and Install rlwrap


Oracle Database 12c on Oracle Linux 6 – Step 12: Download and Install the Oracle 12c Pre-Install Package

Part of this series of posts: Oracle Database 12c on Oracle Linux 6

12-01

Type the following command and press Enter.

yum install oracle-rdbms-server-12cR1-preinstall

12-02

Type y at the Is this ok [y/N]: prompt and press Enter.

Eventually you’ll see a Complete!

Oracle Database 12c on Oracle Linux 6 – Step 11: Download and Install Oracle ASMLib < Previous Post – Next Post > Oracle Database 12c on Oracle Linux 6 – Step 13: Reset the oracle Users Password


Oracle Database 12c on Oracle Linux 6 – Step 11: Download and Install Oracle ASMLib

Part of this series of posts: Oracle Database 12c on Oracle Linux 6

11-01

Click the Firefox icon in the menu bar to open a web browser window.

11-02

Use google to search for oracle linux 6 asmlib and click the Oracle ASMLib Downloads for Oracle Linux6 link.

11-03

Scroll down and click the link in the Library and Tools box.

Note:

The version number of the link could be slightly different if updates have been made.
As of this install it was oracleasmlib-2.0.4-1.el6.x86_64.rpm.

11-04

Click OK to open the rpm with the Package Installer.

11-05

Click Continue Anyway.

11-06

Click Install.

Oracle Database 12c on Oracle Linux 6 – Step 10: Download and Install Oracle ASM Support Packages < Previous Post – Next Post > Oracle Database 12c on Oracle Linux 6 – Step 12: Download and Install the Oracle 12c Pre-Install Package


Oracle Database 12c on Oracle Linux 6 – Step 10: Download and Install Oracle ASM Support Packages

Part of this series of posts: Oracle Database 12c on Oracle Linux 6

10-01

Type the following command and press Enter.

yum install oracleasm-support

10-02

Type y at the Is this ok [y/N]: prompt and press Enter.

Eventually you’ll see a Complete!

Oracle Database 12c on Linux 6 – Step 9: Download and Install Kernel, GCC, and Readline Packages < Previous Post – Next Post > Oracle Database 12c on Oracle Linux 6 – Step 11: Download and Install Oracle ASMLib


Oracle Database 12c on Linux 6 – Step 9: Download and Install Kernel, GCC, and Readline Packages

Part of this series of posts: Oracle Database 12c on Linux 6

09-01

Type the following command and press Enter.

yum install kernel-uek-devel gcc readline-devel

09-02

Type y at the Is this ok [y/N]: prompt and press Enter.

Oracle Database 12c on Oracle Linux 6 – Step 8: Download and Install the Flash Plugin for Firefox < Previous Post – Next Post > Oracle Database 12c on Oracle Linux 6 – Step 10: Download and Install Oracle ASM Support Packages


Oracle Database 12c on Oracle Linux 6 – Step 8: Download and Install the Flash Plugin for Firefox

Part of this series of posts: Oracle Database 12c on Linux 6

08-01

Type the following commands, pressing Enter after each line.

rpm -ivh http://linuxdownload.adobe.com/adobe-release/adobe-release-i386-1.0-1.noarch.rpm
rpm --import /etc/pki/rpm-gpg/RPM-GPG-KEY-adobe-linux
yum install flash-plugin nspluginwrapper.x86_64 nspluginwrapper.i686 alsa-plugins-pulseaudio.i686 libcurl.i686

Note:

I shrank the terminal window so the commands would fit on one line, but this isn’t necessary. You can just continue typing past the end of the line and the command will wrap around to the next line. Don’t press enter until you’ve typed in the entire command. Also, check the output of the command as it’s not unusual to type one of the package names incorrectly. If you do, you can use the up arrow key and fix the command. It’s OK to try to install multiple times.

08-02

Type y at the Is this ok [y/N]: prompt and press Enter.

08-03

Eventually you’ll see a complete.

Oracle Database 12c on Oracle Linux 6 – Step 7: Update Oracle Linux with the Latest Software < Previous Post – Next Post > Oracle Database 12c on Linux 6 – Step 9: Download and Install Kernel, GCC, and Readline Packages


Oracle Database 12c on Oracle Linux 6 – Step 7: Update Oracle Linux with the Latest Software

Part of this series of posts: Oracle Database 12c on Oracle Linux 6

07-01

Type the following command and press Enter.

yum update

Note:

By default your Linux installation points to the public yum repository so there is no longer any need to update your yum configuration to get the above command to work. If you have support then you should first change your yum configuration to point to the correct repository.
Also, the package update process might have a hold on some files. If you get a message about this, just wait and eventually the hold will be released.

07-02

Type y at the Is this ok [y/N]: prompt and press Enter.

Note:

The number of packages may be different when you do your install if there have been more updates since this guide was written. You shouldn’t worry about it.

07-03

Type y at the Is this ok [y/N]: prompt and press Enter.

07-04

Eventually you’ll see a Complete!

Oracle Database 12c on Oracle Linux 6 – Step 6: Reset the root user password < Previous Post – Next Post > Oracle Database 12c on Oracle Linux 6 – Step 8: Download and Install the Flash Plugin for Firefox


Oracle Database 12c on Oracle Linux 6 – Step 6: Reset the root user password

Part of this series of posts: Oracle Database 12c on Oracle Linux 6

06-01

Type the following command and press Enter.

passwd

Type root at the New password prompt and press Enter (you’ll get the above error messages). Type root at the Retype new password prompt and press Enter.

Note:
See the note about Joes in the Introduction. Never use root as the root password for a system where security matters.

Oracle Database 12c on Oracle Linux 6 – Step 5: Disable the Firewall, iptables and SELINUX < Previous Post – Next Post > Oracle Database 12c on Oracle Linux 6 – Step 7: Update Oracle Linux with the Latest Software


Oracle Database 12c on Oracle Linux 6 – Step 5: Disable the Firewall, iptables and SELINUX

Part of this series of posts: Oracle 12c on Oracle Linux 6
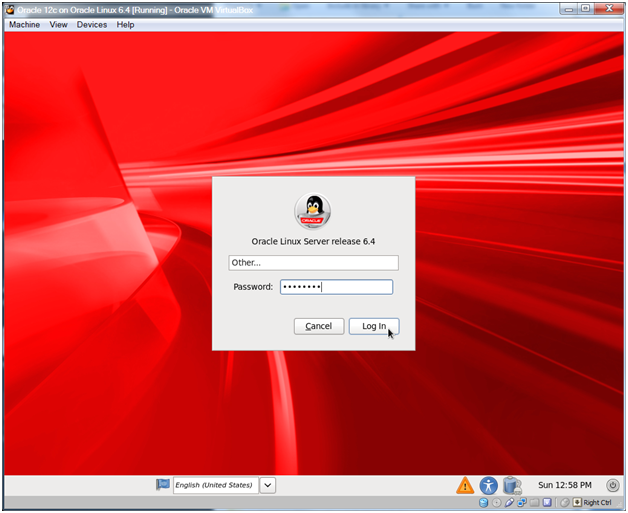
05-01

Click Other….

05-02

Enter root as the username and click Log In.

05-03

Enter rootroot as the password (or the password you used earlier) and click Log In.

05-04

Check Do not show me this again and click Close.

Note:

Or don’t check Do not show me this again if you want to see this warning each time you log in to the X-Windows GUI as root. In general you shouldn’t be logging into the GUI as root. We’re going to do so because it will be easier to use some of the system tools (no pop-ups to log in again as root) to configure our system.

05-05

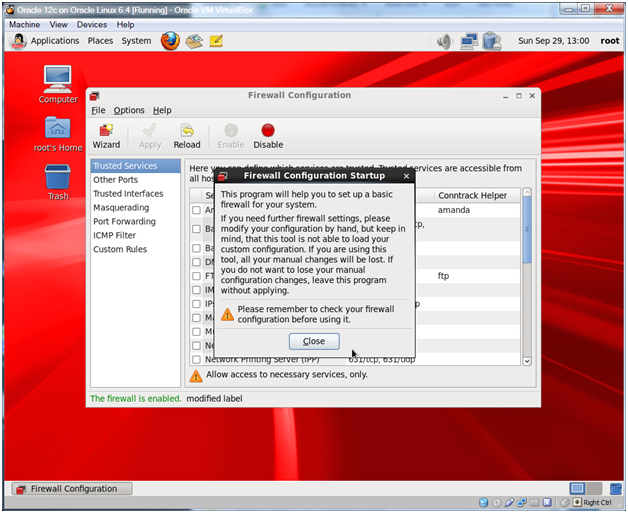
Select System -> Administration -> Firewall from the menu bar.

05-06

Click Close.

05-07

Click Disable.

05-08

Click Apply.

05-09

Click Yes.

05-10

Select File -> Quit to close the Firewall Configuration.

05-11

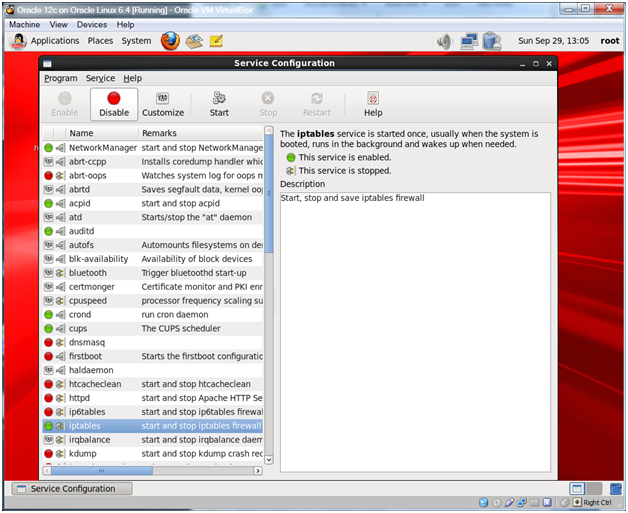
Select System -> Administration -> Services from the menu bar.

05-12

Select the ip6tables service and click Disable.

05-13

Select the iptables service and click Disable.

05-14

Select Program -> Quit to close the Services Configuration.

05-15

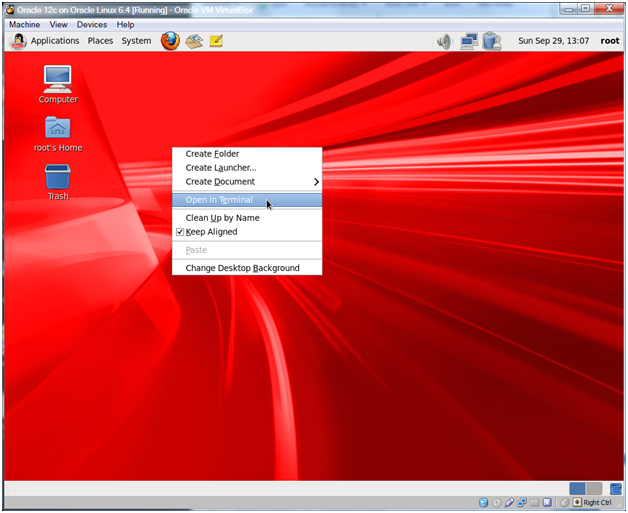
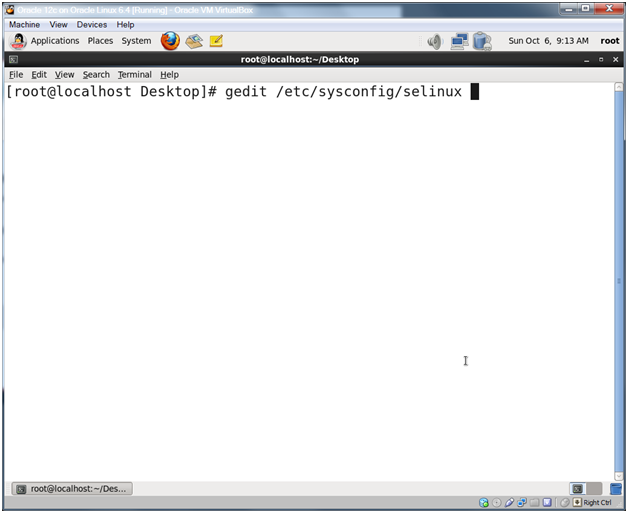
Right-click the desktop and select Open in Terminal to open a terminal window.

05-16

Type the following command and press Enter.

gedit /etc/sysconfig/selinux

Note:

You can use Ctrl-Shift + (the plus key) to change the font size of your terminal windows. I also resize my windows to fill the whole screen. Between major command groupings I’ll also type clear to remove the previous commands from the window and start fresh.

05-17

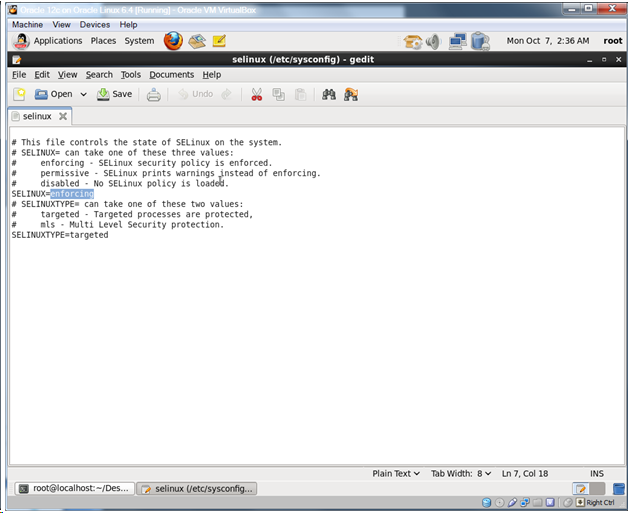
Change SELINUX=enforcing to SELINUX=disabled.

Note:

Why disable SELINUX? According to user 546612 on the Oracle.com forums:

Depending on what pieces of Oracle you are using, there are setuid/setgid issues, there are network interactions, there is fork/exec permission stuff, shared memory, etc. Some stuff in Oracle runs as root, especially if you do RAC. There is a whole whack of IPC.

Note that Redhat recently published a paper that describes how to make SELINUX work with Oracle 11g R2 on Redhat which should work on Oracle Linux too. Since this is a test system, disabling was easier…
http://www.redhat.com/resourcelibrary/reference-architectures/deploying-oracle-11gr2-on-rhel-6

05-18

Make sure your SELINUX line reads SELINUX=disabled and Click Save.

05-19

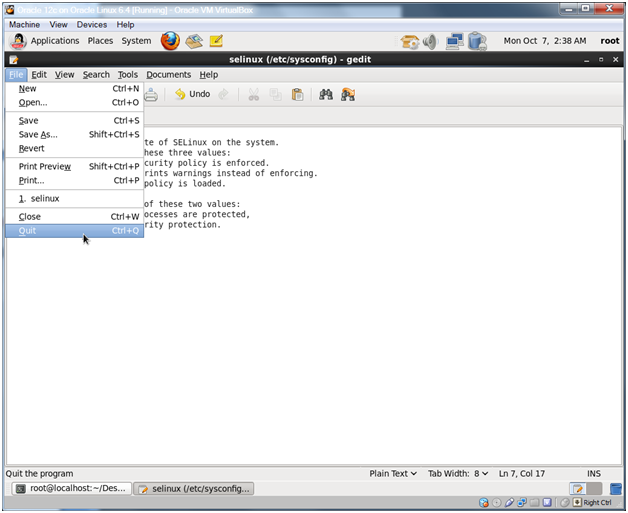
Select File -> Quit from the menu to close gedit.

Oracle Database 12c on Oracle Linux 6 – Step 4: Install Oracle Linux in the Virtual Machine < Previous Post – Next Post > Oracle Database 12c on Oracle Linux 6 – Step 6: Reset the root user password