Tag Archives: Oracle

Oracle Database 12c on Oracle Linux 6 – Step 11: Download and Install Oracle ASMLib

Part of this series of posts: Oracle Database 12c on Oracle Linux 6

11-01

Click the Firefox icon in the menu bar to open a web browser window.

11-02

Use google to search for oracle linux 6 asmlib and click the Oracle ASMLib Downloads for Oracle Linux6 link.

11-03

Scroll down and click the link in the Library and Tools box.

Note:

The version number of the link could be slightly different if updates have been made.
As of this install it was oracleasmlib-2.0.4-1.el6.x86_64.rpm.

11-04

Click OK to open the rpm with the Package Installer.

11-05

Click Continue Anyway.

11-06

Click Install.

Oracle Database 12c on Oracle Linux 6 – Step 10: Download and Install Oracle ASM Support Packages < Previous Post – Next Post > Oracle Database 12c on Oracle Linux 6 – Step 12: Download and Install the Oracle 12c Pre-Install Package


Oracle Database 12c on Oracle Linux 6 – Step 10: Download and Install Oracle ASM Support Packages

Part of this series of posts: Oracle Database 12c on Oracle Linux 6

10-01

Type the following command and press Enter.

yum install oracleasm-support

10-02

Type y at the Is this ok [y/N]: prompt and press Enter.

Eventually you’ll see a Complete!

Oracle Database 12c on Linux 6 – Step 9: Download and Install Kernel, GCC, and Readline Packages < Previous Post – Next Post > Oracle Database 12c on Oracle Linux 6 – Step 11: Download and Install Oracle ASMLib


Oracle Database 12c on Linux 6 – Step 9: Download and Install Kernel, GCC, and Readline Packages

Part of this series of posts: Oracle Database 12c on Linux 6

09-01

Type the following command and press Enter.

yum install kernel-uek-devel gcc readline-devel

09-02

Type y at the Is this ok [y/N]: prompt and press Enter.

Oracle Database 12c on Oracle Linux 6 – Step 8: Download and Install the Flash Plugin for Firefox < Previous Post – Next Post > Oracle Database 12c on Oracle Linux 6 – Step 10: Download and Install Oracle ASM Support Packages


Oracle Database 12c on Oracle Linux 6 – Step 8: Download and Install the Flash Plugin for Firefox

Part of this series of posts: Oracle Database 12c on Linux 6

08-01

Type the following commands, pressing Enter after each line.

rpm -ivh http://linuxdownload.adobe.com/adobe-release/adobe-release-i386-1.0-1.noarch.rpm
rpm --import /etc/pki/rpm-gpg/RPM-GPG-KEY-adobe-linux
yum install flash-plugin nspluginwrapper.x86_64 nspluginwrapper.i686 alsa-plugins-pulseaudio.i686 libcurl.i686

Note:

I shrank the terminal window so the commands would fit on one line, but this isn’t necessary. You can just continue typing past the end of the line and the command will wrap around to the next line. Don’t press enter until you’ve typed in the entire command. Also, check the output of the command as it’s not unusual to type one of the package names incorrectly. If you do, you can use the up arrow key and fix the command. It’s OK to try to install multiple times.

08-02

Type y at the Is this ok [y/N]: prompt and press Enter.

08-03

Eventually you’ll see a complete.

Oracle Database 12c on Oracle Linux 6 – Step 7: Update Oracle Linux with the Latest Software < Previous Post – Next Post > Oracle Database 12c on Linux 6 – Step 9: Download and Install Kernel, GCC, and Readline Packages


Oracle Database 12c on Oracle Linux 6 – Step 7: Update Oracle Linux with the Latest Software

Part of this series of posts: Oracle Database 12c on Oracle Linux 6

07-01

Type the following command and press Enter.

yum update

Note:

By default your Linux installation points to the public yum repository so there is no longer any need to update your yum configuration to get the above command to work. If you have support then you should first change your yum configuration to point to the correct repository.
Also, the package update process might have a hold on some files. If you get a message about this, just wait and eventually the hold will be released.

07-02

Type y at the Is this ok [y/N]: prompt and press Enter.

Note:

The number of packages may be different when you do your install if there have been more updates since this guide was written. You shouldn’t worry about it.

07-03

Type y at the Is this ok [y/N]: prompt and press Enter.

07-04

Eventually you’ll see a Complete!

Oracle Database 12c on Oracle Linux 6 – Step 6: Reset the root user password < Previous Post – Next Post > Oracle Database 12c on Oracle Linux 6 – Step 8: Download and Install the Flash Plugin for Firefox


Oracle Database 12c on Oracle Linux 6 – Step 6: Reset the root user password

Part of this series of posts: Oracle Database 12c on Oracle Linux 6

06-01

Type the following command and press Enter.

passwd

Type root at the New password prompt and press Enter (you’ll get the above error messages). Type root at the Retype new password prompt and press Enter.

Note:
See the note about Joes in the Introduction. Never use root as the root password for a system where security matters.

Oracle Database 12c on Oracle Linux 6 – Step 5: Disable the Firewall, iptables and SELINUX < Previous Post – Next Post > Oracle Database 12c on Oracle Linux 6 – Step 7: Update Oracle Linux with the Latest Software


Oracle Database 12c on Oracle Linux 6 – Step 5: Disable the Firewall, iptables and SELINUX

Part of this series of posts: Oracle 12c on Oracle Linux 6

05-01

Click Other….

05-02

Enter root as the username and click Log In.

05-03

Enter rootroot as the password (or the password you used earlier) and click Log In.

05-04

Check Do not show me this again and click Close.

Note:

Or don’t check Do not show me this again if you want to see this warning each time you log in to the X-Windows GUI as root. In general you shouldn’t be logging into the GUI as root. We’re going to do so because it will be easier to use some of the system tools (no pop-ups to log in again as root) to configure our system.

05-05

Select System -> Administration -> Firewall from the menu bar.

05-06

Click Close.

05-07

Click Disable.

05-08

Click Apply.

05-09

Click Yes.

05-10

Select File -> Quit to close the Firewall Configuration.

05-11

Select System -> Administration -> Services from the menu bar.

05-12

Select the ip6tables service and click Disable.

05-13

Select the iptables service and click Disable.

05-14

Select Program -> Quit to close the Services Configuration.

05-15

Right-click the desktop and select Open in Terminal to open a terminal window.

05-16

Type the following command and press Enter.

gedit /etc/sysconfig/selinux

Note:

You can use Ctrl-Shift + (the plus key) to change the font size of your terminal windows. I also resize my windows to fill the whole screen. Between major command groupings I’ll also type clear to remove the previous commands from the window and start fresh.

05-17

Change SELINUX=enforcing to SELINUX=disabled.

Note:

Why disable SELINUX? According to user 546612 on the Oracle.com forums:

Depending on what pieces of Oracle you are using, there are setuid/setgid issues, there are network interactions, there is fork/exec permission stuff, shared memory, etc. Some stuff in Oracle runs as root, especially if you do RAC. There is a whole whack of IPC.

Note that Redhat recently published a paper that describes how to make SELINUX work with Oracle 11g R2 on Redhat which should work on Oracle Linux too. Since this is a test system, disabling was easier…
http://www.redhat.com/resourcelibrary/reference-architectures/deploying-oracle-11gr2-on-rhel-6

05-18

Make sure your SELINUX line reads SELINUX=disabled and Click Save.

05-19

Select File -> Quit from the menu to close gedit.

Oracle Database 12c on Oracle Linux 6 – Step 4: Install Oracle Linux in the Virtual Machine < Previous Post – Next Post > Oracle Database 12c on Oracle Linux 6 – Step 6: Reset the root user password


Oracle Database 12c on Oracle Linux 6 – Step 4: Install Oracle Linux in the Virtual Machine

Part of this series of posts: Oracle Database 12c on Oracle Linux 6

04-01

Click Start.

04-02

You can click the message and check the Do not show this message again checkbox and then click the little blue x in the top right hand corner. Type Enter to select the Install or upgrade an existing system.

04-03

Again, you can click the message and check the Do not show this message again checkbox and then click the little blue x to dismiss the message. Use the Tab key to move the select to Skip and press Enter.

04-04

Click Next.

04-05

Click Next.

04-06

Click Next.

04-07

Click Next.

04-08

Click Yes, discard any data.

04-09

Click Configure Network, select the System eth0 Network Connection and click Edit…

04-10

Check the Connect automatically selection and click Apply…

04-11

Click Close.

04-12

Click Next.

Note:

You could change the name of the machine here if you wish, but the guide assumes that you’ve left the default of localhost.localdomain.

04-13

Select a city in your time zone and click Next.

04-14

Enter a password for the root user and click Next.

Note:

I use rootroot as the password. We’ll change it to root after we have installed. This generates the below alert.

04-15

Click Use Anyway.

04-16

Choose Create Custom Layout and click Next.

04-17

Select the Free partition under sda and click Create.

04-18

Choose Standard Partition and click Create.

04-19

Use the check box next to the Drive to deselect all drives.

04-20

Change the File System Type to swap, check sda, and set the size to 6144 and click OK.

Note:

I used 6144 because I set my memory size to 6 GB (6144 = 1024 x 6). If your memory size is 4 GB or more you can set this to your memory size. If your memory size is less than 4 GB you can set this to double your memory size.

04-21

Select the remaining Free space on sda and click Create.

04-22

Choose Standard Partition and click Create.

04-23

Use the Mount Point dropdown and choose / as the mount point. Again, deselect all the drives and check sda. Choose Fill to maximum allowable size in the Additional Size Options box. Check the Force to be a primary partition box and click OK.

04-24

You should see the above configuration. Click Next.

04-25

Click Format.

04-26

Click Write changes to disk.

04-27

Click Next.

04-28

Choose Desktop and click Next.

04-29

The install will take a while.

04-30

Click Reboot.

04-31

Click Forward.

04-32

Click Forward.

04-33

Choose No, I prefer to register at a later time and click Forward.

Note:

Oracle Linux Network Support for a year is only $119 and can be purchased at shop.oracle.com. This would give you a valid Oracle CSI which would allow you use the Oracle support system which has a ton of resources. If you do get a support license then you can use the Yes, I’d like to register now choice above.

04-34

Click No thanks, I’ll connect later.

04-35

Click Forward.

04-36

Click Forward.

Note:

If you decide to create a non-root user here then you’ll have an additional choice at the login screen for the system. You should not create the oracle user here as we’ll be using a specific package from Oracle to create the oracle user.

04-37

Click Yes.

04-38

Set your date and time or choose Synchronize date and time over the network and click Forward.

04-39

Oracle Database 12c on Oracle Linux 6 – Step 3: Configure an Oracle Linux Virtual Machine < Previous Post – Next Post > Oracle Database 12c on Oracle Linux 6 – Step 5: Disable the Firewall, iptables and SELINUX


Oracle Database 12c on Oracle Linux 6 – Step 3: Configure an Oracle Linux Virtual Machine

This is part of this series of posts: Oracle 12c on Oracle Linux 6

In this step we’ll configure a virtual machine that we will install Oracle Linux on in the next step.

03-01

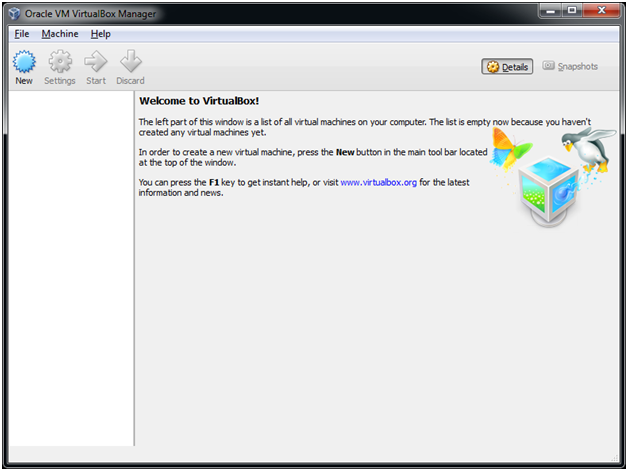
Double click the Oracle VM VirtualBox icon on your desktop.

03-02

Click New to create a new VM.

03-03

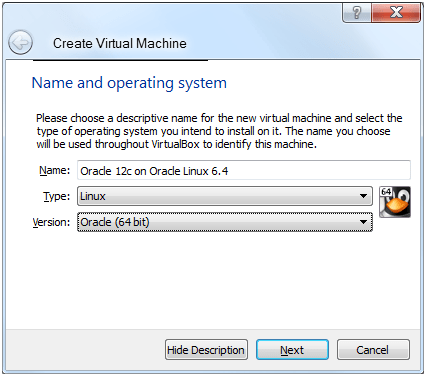
Enter Oracle 12c on Oracle Linux 6.4 as the name, choose Linux for the type and Oracle (64 bit) as the Version.

Note:

Make sure that the Version is Oracle (64 bit) and not just Oracle which ends up getting auto populated for you.

03-04

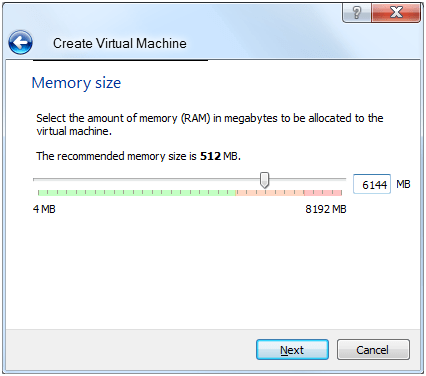
Enter an amount of memory and click Next.

Note:

Use as much memory as you can on your machine. Since I’ve got 8 GB of RAM, I used 6 GB for the virtual machine. If you use less than 4 GB of memory, you’ll get some warnings during the install of Oracle grid which you can ignore. If you only have 4 GB of RAM total on your machine, then use at least 3 GB for the VM.

If you only have 4 GB of RAM on your machine then it might be better to go with 11g R2 instead of 12c. Some folks have had failures when only 4GB was allocated to the virtual machine.

03-05

Choose Create a virtual hard drive now and click Create.

03-06

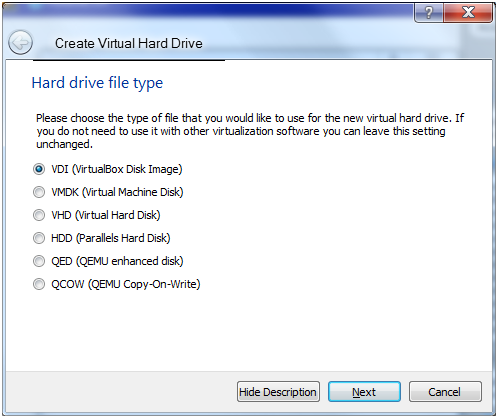
Select VDI (VirtualBox Disk Image) and click Next.

03-07

Choose Dynamically allocated and click Next.

Note:

This is a test system so we’re going to go with dynamically allocated disks. Fixed size disks are faster, but they will take up much more room. Using all the disk sizes presented in the guide, I ended up with 40.5 GB of used space for the VM by the end of the install.

03-08

Change the size to 100 GB and click Create.

Note:

When entering the size in the box (much easier than using the slider) you have to add the GB at the end of your 100 to get 100 GB. If you don’t put the GB you’ll end up with 100 MB which won’t work.

03-09

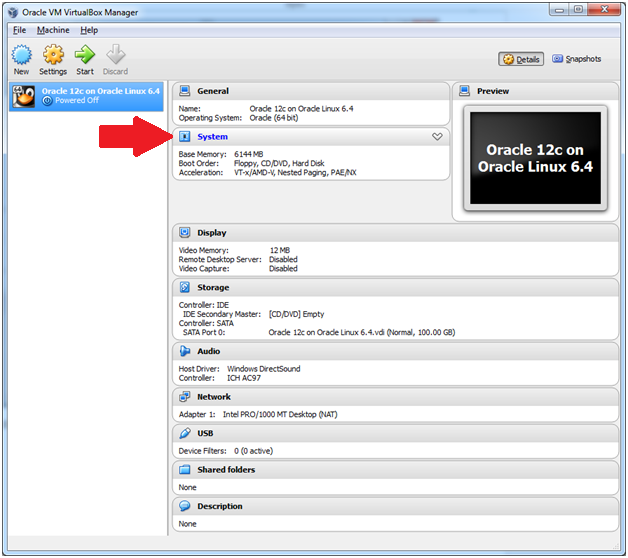
Click the word System in the details pane to bring up the System dialog box.

03-10

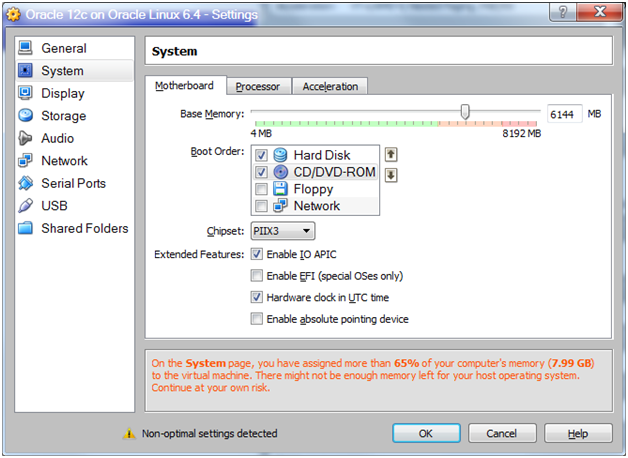
Remove the Floppy (uncheck) and optionally change the order of the Hard Disk and the CD/DVD-ROM.

03-11

Click the Processor Tab and enter the number of processors.

Note:

Ideally you can set this to be as many physical cores as there are on your CPU(s), I chose 4.

03-12

Click the Acceleration tab and confirm that the two boxes are checked.

Note:

Remember that your processor has to support these features.

03-13

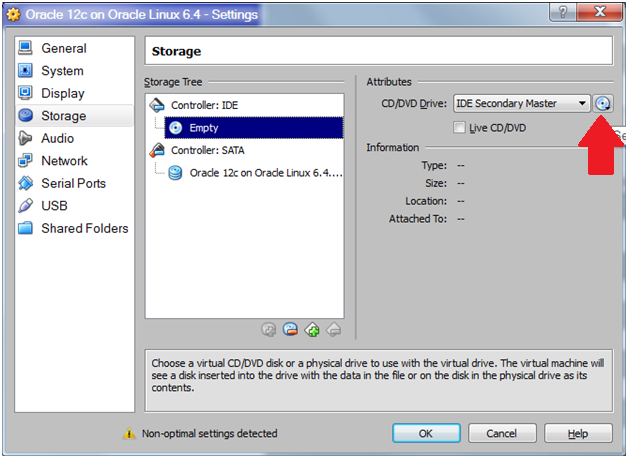
Select the Storage choice on the left hand side of the dialog and then select Empty below the Controller: IDE and then click the disk icon in the Attributes section.

03-14

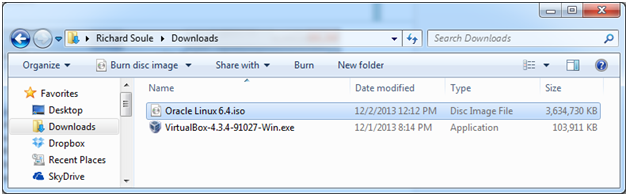
Navigate to your Downloads folder, select the Oracle Linux 6.4.iso file and click Open.

03-15

You should see the Oracle Linux 6.4.iso under the Controller: IDE.

03-16

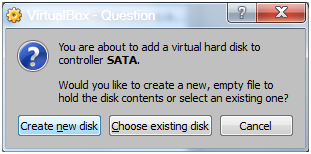
Select Controller: SATA in the Storage Tree and click on the Add Hard Disk icon (the one on the right).

03-17

Click Create new disk.

03-18

Choose VDI (Virtual Disk Image) and click Next.

03-19

Choose Dynamically allocated and click Next.

03-20

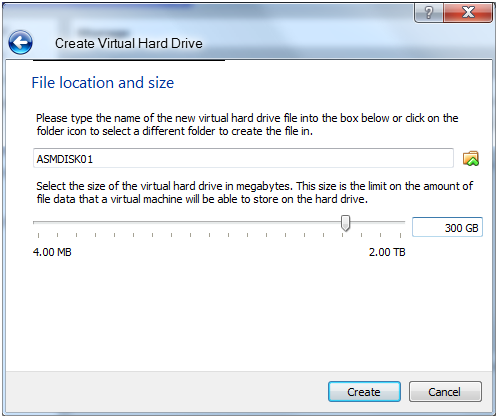
Name the disk ASMDISK01 and change the size to 300 GB.

Note:

300GB is big, but using Oracle 12c Oracle now requires 22 GB to install a container DB with a pluggable DB. 300 GB is also a common size for fast 15K hard drives, so I went with 300 GB. Since these are dynamically allocated disks, they are not going to take up 300 GB each. If you decided to go the fixed disk route, then you’ll need to make these about 12 GB each.

03-21

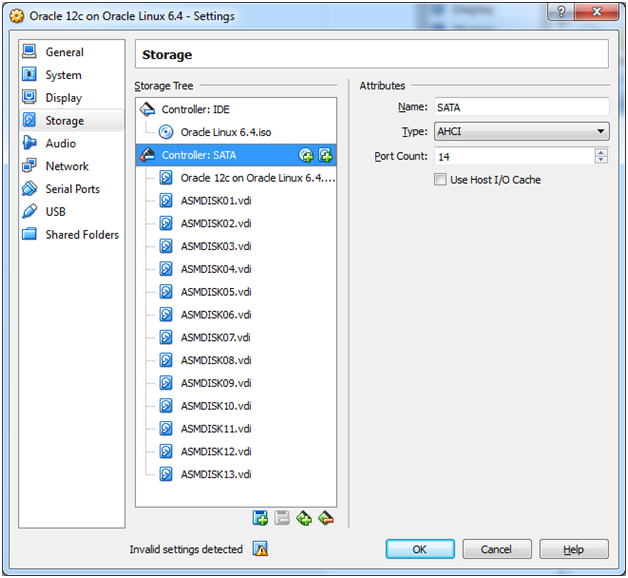
Repeat the previous ASM disk creation steps 12 more times changing the disk names to ASMDISK02 to ASMDISK13.

Note:

We really only need this many disks to follow the Oracle training (for 11g classes). 8 gives us 4 each for the +DATA and +FRA disk groups which would be more than enough.

03-22

When finished you should have a storage configuration that looks like the above. Click OK.

Oracle Database 12c on Oracle Linux 6 – Step 2: Download the Oracle Linux 6.4 iso < Previous Post – Next Post > Oracle Database 12c on Oracle Linux 6 – Step 4: Install Oracle Linux in the Virtual Machine


Oracle Database 12c on Oracle Linux 6 – Step 2: Download the Oracle Linux 6.4 iso

Part of this series of posts: Oracle Database 12c on Oracle Linux 6

In this step we’ll grab Oracle Linux from the eDelivery site. Note that you could see a different (more recent) version and give that a try if you’d like. I used 6.4 and it worked just fine.

02-01

Using your browser, go to http://edelivery.oracle.com/linux and click Sign In/Register.

Note:

There are two different Oracle Software Delivery Cloud sites. One is for Oracle Linux and Oracle VM, the other if for everything else Oracle. Make sure to add the /linux to the eDelivery url or you’ll end up in the wrong place.

02-02

Enter your Oracle.com Username and Password and click Sign In.

Note:

If you didn’t sign up for an Oracle.com account yet, click the Sign Up button and complete the registration process.

02-03

Check both agreement terms and click Continue.

02-04

Choose Oracle Linux for Select a Product Pack and x86 64 bit for Platform and click Go.

02-05

Click the Oracle Linux Release 6 Update 4 Media Pack for x86_64 (64 bit) link.

Note:

If, by the time you read this, there is a later version of the Oracle Linux media, feel free to give it a try. As long as it’s a higher release than 6.4, it probably should work. If it doesn’t just look for the 6.4 version and use that.

02-06

Click the Download button for Oracle Linux Release 6 Update 4 for x86_64 (64 bit).

02-07

Chose Save File and click OK.

02-08

Using Windows Explorer, open your Downloads folder and find the V37084-01.iso file.

Note:

The name of the file could be different if you’ve used a later version of the file. Adjust accordingly.

02-09

Change the file name to Oracle Linux 6.4.iso.

Oracle Database 12c on Oracle Linux 6 – Step 1: Download and Install Oracle VirtualBox and Oracle VirtualBox Extension Pack < Previous Post – Next Post > Oracle Database 12c on Oracle Linux 6 – Step 3: Configure an Oracle Linux Virtual Machine