Category Archives: Code

Oracle Database 12c on Oracle Linux 6 – Introduction

Part of this series of posts: Oracle Database 12c on Oracle Linux 6

My name is Rich Soule. I work as an Enterprise Solution Architect for RFD & Associates a Principal at C2 Consulting (starting in 2015) helping people architect and build hardware and software solutions to business problems, often with Oracle technology. I also teach the Oracle Database Certified Professional curriculum at Austin Community College. I put together this document to help people build Oracle database test systems and/or classroom/learning environments.

We used to build test systems on actual test computers (and we still do sometimes depending on what you are testing) but virtualization technology makes building test systems a breeze, so it is often leveraged for test systems today. When Oracle acquired Sun they also acquired VirtualBox, a free tool for building virtual machines. We’re going to use Oracle VirtualBox for this installation, but you could just skip the VirtualBox portion and use the guide to build an Oracle Linux desktop system on physical hardware if you wish.

Some notes:

Passwords – After doing demos for many years, I learned that it’s very hard to forget a password for a demo/test system if the password is always the same as the username. Thus the password for root ends up being root and the password for oracle ends up being oracle. In the administrative world we call these accounts ‘Joes’. Joes are highly unsecure and should never be used for any type of production system, nor should they be used for test systems where security matters. If security doesn’t matter, then Joes are perfect. When it comes to creating database passwords, Oracle Database 12c doesn’t let you do that out of the box so we’ll be using (at least initially) oracle_4U as the password for all oracle accounts (although I might advise you to turn them into Joes later).

Test – Yep, this is a document for building a test system and not even a real test system, but instead just a system that you can use to test out various features of Oracle or maybe as a classroom environment. In no way am I suggesting that you use these exact steps to build a production system although you’ll probably want to leverage quite a bit of the knowledge gained in your own systems. Just make sure that you are following best practices, especially as it relates to security.

Windows 7 – This guide was developed on my Windows 7 computer. I’m not sure if this will work on Windows 8 or any other host OS for that matter. It might, it might not. Remember that Microsoft added in a bunch of ‘security’ stuff to Windows so from time to time during the install process you may get User Access Control windows that pop up. I just accept whatever changes are going to be made. Obviously you’ll need administrative privileges on your computer to do this install.

Firefox – I used Firefox 24 during the Windows portion of this install. If you are using a different browser (Chrome, IE, or an older version of Firefox, or even something else), you’ll have to adjust what you’re doing to fit your browser of choice.

Screenshots – Some of them may be just a bit different than what you’ll see. I had already installed VirtualBox and built other VMs. Also I moved some of the screen shots around and took screen shots on different days, so ignore the time changes and background color changes that may pop up from time to time.

Oracle Database 12c on Oracle Linux 6 < Previous Post – Next Post > Oracle Database 12c on Oracle Linux 6 – Assumptions


Oracle Database 12c on Oracle Linux 6

Rich Soule’s Complete Step-by-Step Guide to building a classroom environment by Installing and Configuring Oracle Database 12c with pluggable databases on Oracle Linux 6 using the Oracle Unbreakable Kernel on Oracle VM Virtualbox with Oracle Restart, Oracle ASM, Oracle SQL Developer, Enterprise Manager Database Express, Oracle Virtualbox Extensions, and rlwrap for Oracle command line tools.

This is round two of this document… I originally started this a few years ago, but this time I’m going to finish posting everything.

This series consists of the following posts:


Next post > Oracle Database 12c on Oracle Linux 6 – Introduction


How to get the Oracle Linux ISO from Oracle’s Software Delivery Cloud

Update from April 2014: This post has been superseded by this post: Oracle Database 12c on Oracle Linux 6


This is Step 2 in my 13 step process for creating an Oracle Education classroom environment using VirtualBox.

Here’s the previous step, Installing Oracle VirtualBox on Windows 7.

In this step we are going to get the Oracle Linux ISO from Oracle’s official Software Delivery Cloud called eDelivery. There are actually two Oracle Software Delivery Clouds (or at least two sections), one if for Oracle’s general software, and the other is for Oracle Linux, Oracle Virtual Machine and Oracle Virtual Machine templates. You reach the first site (we’ll go there later) at  http://edelivery.oracle.com and you reach the second (the one we are going to us now) by going to http://edelivery.oracle.com/linux. (Note the extra /linux on the end.)

We’ll actually be using the Oracle Linux 5.8 DVD image, not the Oracle Linux 6.3 image that is currently available (at the time of this writing). While Oracle Linux 6 is now certified for the Oracle Database, Oracle has yet to release some of the nice scripts (oracle-validated for example) for Oracle Linux 6. Oracle is going to be building new scripts (RPMs actually) which instead of being generic Oracle RPMs are instead going to be targeted at specific products like Oracle Database and WebLogic. So we’ll have ‘ oracle-rdbms-server-11gr2-preinstall’ and probably other RPMs for doing all the stuff required to set up the Oracle environment correctly for an Oracle Database install on Linux. But for now, Oracle Linux 5 has the oracle-validated RPM available and since we’re really much more concerned about our Oracle Database environment instead of having the latest and greatest Linux version, we’re just going to stick with Oracle Linux 5.8. Note that if you do decide to go down the Oracle Linux 6.3 path, you’ll also need a different version of Oracle 11g R2, Oracle 11.0.3 which is currently only available from Oracle support.

Let’s get started:

  1. Navigate to https://edelivery.oracle.com and click Sign In / Register.

    Oracle Software Delivery Cloud - Oracle Linux and Oracle VM

    Oracle Software Delivery Cloud – Oracle Linux and Oracle VM

  2. Enter your Username and Password and click Sign In. Obviously if you don’t yet have an Oracle.com account, you can go through the registration process to create one by clicking the Sign Up link.

    Oracle.com Sign In

    Oracle.com Sign In

  3. Agree to both the terms of service and the export restrictions and click Continue.

    Terms and Restrictions Agreement

    Terms and Restrictions Agreement

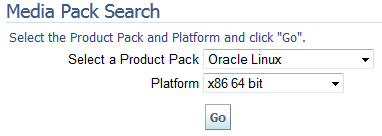
  4. Choose Oracle Linux from the Select a Product Pack drop down and x86 64 bit from the Platform drop down and click Go. If you are installing on a 32 bit system, you can download the 32 bit software.

    Media Pack Search

    Media Pack Search

  5. In the results list find the Oracle Linux Release 5 Update 8 Media Pack for x86 64 (64 bit) link and click it.

    Oracle Linux 5 Update 8

    Oracle Linux 5 Update 8

  6. Click the first Downloadbutton in the Select column to download the ISO for Oracle Linux Release 5 Update 8 for x86_64 (64 Bit).

    Linux 5 Update 8 Download

    Linux 5 Update 8 Download

  7. Click OKto download the ISO.

    Download Dialog

    Download Dialog

  8. Wait for the download to complete. This will take a while depending on the speed of your connection.

    Download Progress

    Download Progress

We’ll be using this ISO image during the install of Oracle Linux. I often move the file to a more appropriate location than my downloads folder, but since we’ll be able to delete the file once we’ve finished with the Linux install it’s not that important to move it. If I decide that I’ll be keeping the file around for other installations, then I rename the file. Oracle_Linux_Release_5_Update_8.iso is a lot easier to figure out months down the road than V31120-01.iso.

Note that even though this is a DVD image that could be burned to DVD, there is no reason to do this as Virtual Box can use the file directly.


Installing Oracle VirtualBox on Windows 7

Update from April 2014: This post has been superseded by this post: Oracle Database 12c on Oracle Linux 6


This is Step 1 in my 13 step process for creating an Oracle Education classroom environment using VirtualBox.

I used Oracle VirtualBox to create my classroom environment for a few reasons:

  • VirtualBox is simple to install.
  • VirtualBox allowed me to create an environment that closely matched the Oracle Education training material. I could basically ignore the physical machines that I was using.
  • Snapshots created before each lesson would allow the students to quickly move backwards or forwards should they miss a lab or make a mistake with their environment.
  • It was really easy to copy the created virtual machine to my student’s machines.

This post is mostly here for a completeness standpoint as installing VirtualBox is really straight forward. Also note that while the version below is 4.1.16 at the time this was written, you should grab whatever the current version is from the site when you complete this step.

  1. Open VirtualBox.org in a browser and click on the Downloads link in the left menu.

    VirtualBox.org Home Page

    VirtualBox.org Home Page

  2. Click the x86/amd64link next to the VirtualBox for Windows hosts bullet.

    Windows Download

    Windows Download

  3. Click Save File.

    Save File

    Save File

  4. Double click the fileyou just downloaded. I used Firefox to download the file, so I can just double click the file from the Downloads window.

    Doubleclick file in downloads window

    Double click file in downloads window

  5. Depending on your security settings, Windows may ask you what you want to do with the file. Click Run.

    Run the file

    Run the file

  6. Click Next.

    Welcome Screen, click Next

    Welcome Screen, click Next

  7. Click Next.

    Custom Setup, click Next

    Custom Setup, click Next

  8. Click Next.

    Create Shortcuts, click Next

    Create Shortcuts, click Next

  9. Click Yes.

    Network Interfaces, click Yes

    Network Interfaces, click Yes

  10. Click Install. Depending on your security settings, Windows User Account Control may ask if you want to allow the program to make changes to your computer, click Yes if it does.

    click Install

    Click Install

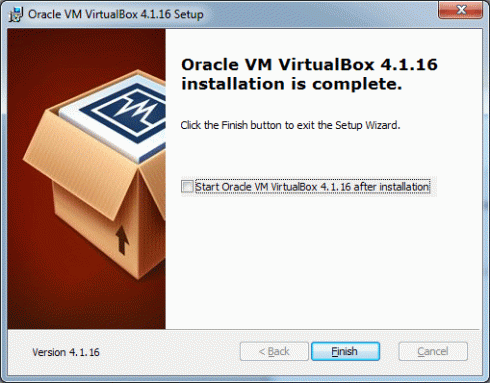
  11. Uncheck the Start Oracle VM VirtualBox after installation checkbox and click Finish.

    Click Finish

    Click Finish

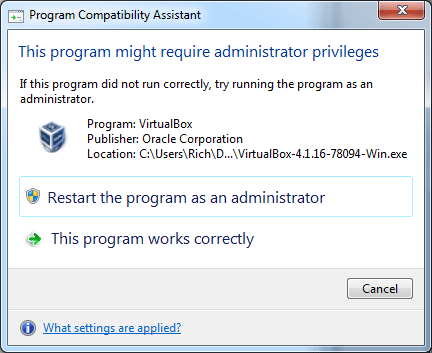
  12. If the Program Compatibility Assistant pops up, click This program works correctly.

    Program Compatibility Assistant, click This program works correctly

    Program Compatibility Assistant, click This program works correctly

  13. Back in the browser, click on the All platforms link next to the VirtualBox Extension Pack bullet.

    Extension Pack link

    Extension Pack link

  14. Click OKto open the extension pack with VirtualBox.

    Open Extension Pack, click OK

    Open Extension Pack, click OK

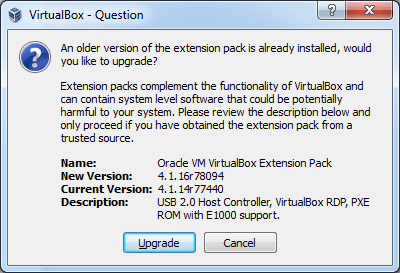
  15. Click Install. (Note the image below has Upgrade instead of Install because of a previous installation).

    VBox Question, click Upgrade

    VBox Question, click Install

  16. Scroll down to the bottom of the license agreement and click I Agree. If Windows User Account Control asks you if you want to allow the following program to make changes to this computer, click Yes.

    License Agreement, click I Agree

    License Agreement, click I Agree

  17. Click OK.

    Click OK

    Click OK

As I mentioned at the beginning, installing Oracle VirtualBox is pretty straight forward. You can leave VirtualBox open for now as we’ll soon be using it create our virtual machine.

But first we have to download an Oracle Linux ISO to use as our boot media. To learn how to do that, go to Step 2 of my 13 step process for creating an Oracle Education classroom environment using VirtualBox.

You can now proceed to the next step in the process, How to get the Oracle Linux ISO from Oracle’s Software Delivery Cloud.


Using Oracle VirtualBox to create an Oracle Education classroom environment

Update from April 2014: This post has been superseded by this post: Oracle Database 12c on Oracle Linux 6


I created this blog last year so I could write down the steps taken to create an Oracle Education classroom environment using Oracle VirtualBox. I teach Oracle Education classes for Austin Community College (ACC) and also for RFD & Associates, Inc. under a program called the Workforce Development Program. You can see my previous blog post for a description of the Workforce Development Program. Tomorrow I’m teaching a class at ACC to do all of the below with my students from the DBA I and DBA II courses plus a special guest, so I thought it was finally time to start getting this all down.

There are a number of steps to create the classroom environment. Over the next few weeks I intend to write a post for each of the steps. As each post is written, I’ll update each step in the list below to point to those posts.

Here’s the steps that I took to create the classroom environment:

  1. Download and install Oracle VirtualBox including the Extension Pack.
  2. Download the Oracle Linux ISO from edelivery.oracle.com/linux.
  3. Create a virtual machine running Oracle Linux.
  4. Create a local yum repository from the DVD content and add asmlib downloaded from linux.oracle.com.
    While you could just use an online repository instead of a local repository, the local repository allows you to install RPMs even if you are not connected to a network. I find this is nice from time to time, and we are more worried about the Oracle Database than we are about having the most up to date Linux environment.
  5. Install asmlib, asmsupport, and the oracle-validated RPMs and create the required directories including a stage directories for Oracle Grid Infrastructure and Oracle Database.
    We’re also going to make the Linux User IDs and Group IDs match the training material.
  6. Install Oracle VirtualBox Guest Additions.
  7. Install rlwrap.
    Optional, but oh so nice.
  8. Create the ASM disks and then configure and start ASM.
  9. Configure the Oracle user’s environment including a really nice login.sql script.
  10. Download Oracle Grid Infrastructure and Oracle Database 11g R2.
  11. Install Oracle Grid Infrastructure and create a +FRA (Fast Recovery Area) disk group in addition to the +DATA disk group.
  12. Install the Oracle Database software.
  13. Use the Database Creation Assistant to create a Database instance.

If you follow the above steps, you’ll have a training environment that matches the Oracle training material for the majority of  the Oracle Database Administrator training classes (but not all, for instance the Real Application Clusters or RAC class is obviously a bit different).


Delivering Oracle Education through the Workforce Development Program

I teach the Oracle Certified Professional (OCP) courses at Austin Community College (ACC). ACC offers the exact same course material as Oracle Education through an Oracle program called the Workforce Development Program (WDP). I also offer Oracle technology training through RFD & Associates, Inc. on a customized basis for your organization. RFD & Associates is also a WDP partner.

There are two main differences between the Oracle Education program and the Workforce Development Program.

The most important difference is that courses offered by a Workforce Development Program partner can only be delivered at a maximum rate of 12 hours per week. The Oracle Education program typically offers courses in a 1 week full time format (around 40 or so hours). It’s great for folks who can spend that much time away from work, but it does have some drawbacks with regards to time commitment and also with regards to cost. Also many folks find that 40 straight hours of Oracle training can be a bit like drinking from a fire hose. With the Workforce Development Program at ACC we take a much more relaxed pace with 20 classes of 3 hours each (2 per week) for a total of 60 hours per class. At RFD we can build a timeline that works for you. Would you like three 4 hour days per week? Would you like two 12 hour days? Do you want to do 12 hours on Friday and Saturday and then another 12 hours on Sunday and Monday? Basically we can put together something that works for you as long as we don’t go over 12 hours per week per class.

The other difference is that when you take a class through Oracle Education (or one of it’s partners), you are connecting directly into servers that Oracle runs internally. This is nice as they tend to be very nice servers with lots of resources. Of course set up time for the organization offering the training is very low. You ask Oracle to provision the servers for your students and they do so. Very easy! However, there are some downsides. Once the class is over, your server is gone. This means that if you want to do some extra work or practice for the certification exams, you are on your own. At ACC and RFD we use Oracle VirtualBox to create a virtual environment for the training. While the default at ACC is to use the ACC classroom computers to run the VirtualBox training environment, you are free to use your own laptop if you wish. At RFD we can either use our computers or your computers. If you use your own computer you have the flexibility to work on the exercises and practice for the exams outside of class time. The downside, of course, is that your laptop or desktop is sometimes a bit slower than the Oracle internal servers. Sometimes this means that a lab exercise will take a bit longer to run.

If you have any questions about getting Oracle Education through the Workforce Development Program either from ACC or RFD, please feel free to reach out to me.


Thoughts on my install of Oracle Restart, Oracle Automatic Storage Management and Oracle Database 11g R2 on 64 bit Windows 2008

Last week I spent some time with a client installing Oracle on their production servers. I’ve done lots of installs using Unix/Linux, but it had been a long time since I had done anything on Windows. Windows is supposed to be a whole lot easier than Linux, right?

We started by formatting the database storage disks into two sections, using the inner cylinders for our planned Fast Recovery Area (+FRA) and then the outer cylinders for the database data files (+DATA). Of course we formatted the disks and gave them nice descriptive names, only to find out later that although you format the ASM disks on Linux/Unix, you don’t format them on Windows. Windows wants raw disks. Which makes sense because NTFS really isn’t the greatest…

Once we finished formatting the disks the correct way, we went ahead and created the oracle user and added oracle to the Administrators group. We then installed the Grid Infrastructure and created the DATA disk group for ASM. Once the install was finished we went ahead and added the FRA disk group. With everything in place, the next step was to install the database.

There were two tricks during the database install, one we found by reading the release notes and install documentation, and the other we ended up not discovering until the next day. The first trick is that even though the oracle user was a member of the Administrators group, you should still right click on the cmd.exe icon and choose Run as administrator from the context menu. Everything progressed along nicely until we go to the portion where the Database Configuration Assistant tried to create the database. DBCA gave us the following warning:

Database Configuration Assistant: Warning
PRCR-1006: Failed to add resource ora.orcl.db for null
PRCR-1071: Faild to register or update resource ora.orcl.db
CRS-0245: User doesn't have enough privilege to perform the operation.

That seems strange… oracle is a member of the Administrators group and we started dbca from an Administrative command prompt, why are we getting this warning? It doesn’t look like a good warning, but it was just a warning, so let’s continue and see what happens… After a few more warnings dbca completed, but it was obvious that the installation didn’t work correctly. We used the new oracle deinstall command for Windows and gave the install another shot, only to run into the same errors. This time we decided to see what Google had to say. Searching for those errors didn’t turn up much help in the Windows world. Most folks who have seen those errors before were using Linux and they were having problems with the required groups. Nobody else seemed to be running into those errors on Windows… After asking around a bit and doing some more searching, we decided to take a step back and review everything to make sure we on track. Step 1: Make sure oracle is in the Administrators group. Imagine our surprise to find out that oracle wasn’t a member of Administrators! I was positive that we’d done this first thing in the morning, but apparently we hadn’t. Did I click Cancel instead of OK or something? Who knows… but at least we figured out why the install was working. After adding oracle (back?) into the Administrators group, everything worked just fine. We finished up the install and started getting the database ready for the migrated content from the old system which took us to the end of the day.

The next day we logged into Enterprise Manager Database Control (EM) and attempted to create some export directories using EM. We’d already stored the credentials for the oracle user in EM but for some reason they were no longer working. That’s strange, why not? It was working just fine yesterday… We did some testing and found out that we could configure EM with a different Administrator account and things would work, but not oracle. What was going on? It didn’t make any sense at all! OK: Start at the beginning. Step 1: Check to make sure that oracle is a member of the Administrators group. This time I have to say that I wasn’t as surprised as I was the first time when I saw that oracle was no longer a member of the Administrators group, but I was still curious as to what was happening. I turned to the network administrator only to see a very sheepish grin on his face. It turns out that the organization had configured a domain rule to remove administrator privileges from unknown users. This would run a couple of times a day and we had run into in the middle of the day during our first install and again on our second day. Once we fixed this by adding oracle to the list of known administrators, everything worked just fine again.

So, lessons learned:

  1. ASM on Windows uses raw storage.
  2. Run your cmd commands as administrator.
  3. Make sure there are no funky domain rules to remove administrator privileges from oracle!

My hope is that the next person who runs into this on Windows finds this post. Maybe not… but at least I’ll never forget as writing the blog post and having the experience of the install gives me a better chance of remembering this in the future.


Intercontinental Ballistic Microfinance

Data Visualization is a hobby of mine. I’ve got Visualizing Data and The Elements of Graphing Data by William S. Cleveland sitting just a few feet away from me. They really are two of the best books on presenting information that you can buy.

When small sets of data are presented it is often in a simple report or maybe a chart. But how do you present 5 plus years of data between 620,000 lenders and 615,000 borrowers? That’s 4,033,920 loan connections! While a simple report or chart can easily convey high level summary information of vast amounts of information, adding animation for time and color for categorization really makes the data come alive.

This video shows a great way to do just that. Color and animation really elevates the simple data (This lender sent money to this borrower on this date, and this borrower repaid their loan on this date) into information. I find this fascinating to watch. Beware, there is sound so if you are checking out Cars and Code from work you might want to turn down your speakers or mute them. The video looks great in full screen on a big monitor in High Def. You have to go to the Vimeo site to watch it in HD. Just hover over the video and click the word Vimeo and it will take you to a page where you can watch this in HD. I love the explosion of loans that happens in the fall of 2006 when Kiva is shown on Frontline.

BTW, a few of those loans are mine. Kiva is a great site that allows borrows and lenders to connect. Kiva takes nothing from the money you lend and charges nothing to the field partners who handle the borrowers loans. Kiva is supported by optional donations and from grants, corporate sponsors, and foundations. Kiva has recently added the ability for borrowers in the US to hook up with Kiva lenders worldwide.  You can join a Kiva team which is kind of fun. The team can set goals and discuss who they are lending to and why.

The best data visualizations are ones where the viewer changes their behavior. If you are not a member of Kiva, why not get started with Kiva today?


Cars and Code goes wide track

This site is best viewed at a resolution of 800 x 600. Ugh. If I ever see anything like that on a site, I’m gone in a flash. Yet today, many web sites seem to be built for a resolution of 800 x 600. Sometimes even smaller!

I have a 30″ monitor that I run at 2560 x 1600 resolution. I don’t say this to brag (OK, maybe just a little bit), but instead to bring up what I consider to be a big problem with many web sites. It’s really annoying to have a site that looks like the image on the right.
Cars and Code using the default Elegant Grunge Theme

Cars and Code using the default Elegant Grunge Theme on my big monitor

That’s a LOT of white space. Now this isn’t all that big of a deal unless the content requires you to scroll. If all the content that you want to read fits in one screen then a centered narrow screen isn’t really all that bad. But having to scroll through a LONG story/article and watching all that wasted white space go by is something that annoys me. This morning I read this article from East Bay Express on Yelp and the Business of Extortion 2.0. It was an interesting read [although I’m not sure you can trust everything you read on the internet… 😉 ], but the whole time I’m reading through the six pages(!) at 11 words or so a line, I’m thinking “Man, this would be so much easier to read if there was more content on the screen.” It got even worse when I started looking at the comments (all 223 of them) and my scroll bar turned into a tiny little sliver on the right edge of my browser. I do understand that less content on more pages gives a site more hits, but even if you click the link for Full Text it just dumps all six pages into that one narrow column. My conclusion: I’m probably not going to trust Yelp! as much as I have in the past and East Bay Express needs to use a wider format for it’s articles.

That’s not to say that you can’t go too far the other way. If you are reading on the internet (as opposed to just scanning) then it can get a bit hard to make the jump across a screen that’s 2560 pixels wide. When I read PDF documents on my computer I usually use the 2 page non-scrolling view, as just about half the screen on a 2560 pixel width monitor is the right width for me. To me the ideal web site, particularly with content that you will READ as opposed to SCAN, is one where the reader has the choice of how it will appear. Tyler’s blog is like that. He’s got a lot of code examples that look better on a wider screen. Anton’s blog is pretty good too. The whole screen is used even if the side bar on the right hand side is a bit wide. (Sorry Anton!)

I’m not sure why I ended up choosing WordPress to host Cars and Code. I actually have a few other sites on the web and I could have installed WordPress there instead of using the hosted server, but it just seemed so easy to use WordPress on their servers instead of mine. It took minutes to turn carsandcode.wordpress.com into carsandcode.com. They have a number of predefined themes and many of them are quite good. Unfortunately for me, I happened upon Michael Tyson’s excellent Elegant Grunge theme. For some reason I immediately liked it (as do over 111,200 other people using WordPress!). It really seemed to fit in with Cars and Code. Elegant Code. Grungy Cars. Check! Now I say unfortunately because Elegant Grunge is one of those ‘all your content gets mushed up into the middle of the page’ type of themes. I looked around at some other themes but just kept on coming back to Elegant Grunge.

Well it turns out that for a small fee you can upgrade your WordPress account to enable you to customize the CSS for your blog. I’m not a CSS expert by any means, but with just a few modifications of the CSS and a bit of playing in Photoshop I was able to increase the width of Cars and Code.

Here’s how:

There are three main images that make up the background of the theme: header.png, body.png and footer.png. If you have a side bar (like these blog posts) then you use the default images. If you have no side bar (like my About and Rich Soule Racing pages) then you use header-no-sidebar.png, body-no-sidebar.png and footer-no-sidebar.png. I’m not using the two sidebar style, nor the rtl style (right to left), but there are images for those too. Since I’m not using those, I didn’t modify them. That means that of the four choices for elegant grunge in Appearance -> Theme Options: Content-Sidebar, Sidebar-Content, Content-Sidebar-Sidebar, and Full Width (No Sidebar), these modifications only modify Content-Sidebar and Full Width (No Sidebar). If you want to use the other options then you’ll have to update the images yourself. With the default images and the two theme options I’m using, you get this:

Quick Specs (all measurements in pixels):

  1. One sidebar: main column width is 490, sidebar width is 220.
  2. No sidebar: main column width is 760.
Cars and code at 1024 x 768

Cars and code at 1024 x 768

This works if you have a really small monitor. You can actually fit the content section (minus the side bar) of the default Elegant Grunge theme on a 800 x 600 monitor. That’s cool… except SVGA (800 x 600 resolution) was introduced in 1989. That’s right, 1989. That’s before some of you were born… While 1024 x 768 was actually introduced in 1987, it became a standard with more adoption starting in 1990. Now were only talking about a resolution that is only two decades old. That said, an iPad2 has a screen resolution of 1024 x 768, so that became my compromise resolution. If the site was readable on 1024 x 768, I would consider it a success. But I’d like the content to use up as much as that 1024 width as possible while still looking largely like Michael’s theme. I used the Full Width (No Sidebar) theme option (which is used on the Rich Soule Racing Page, see the image at the left) as my test and at a content width of 955 pixels everything fit on the screen without much space to spare. When using the Content-Sidebar theme, I played around with sizes until the images for the date of the post didn’t overlap the vertical line separating the content body from the sidebar. By the way, Firesizer, a plug-in for Firefox was really helpful for looking at my site in different resolutions. (You are using Firefox and Firebug for development, right?)

A quick session with Photoshop (I tried Gimp first, but layers are so much easier in Photoshop than Gimp) stretched Michael’s images from their default resolution of 813 pixels wide for the body (there’s a bit of white space on each side of the image) to 1200 pixels wide. That’s an extra 387 pixels for content or a 47.6% increase in content width. That seemed about right. It’s not as good as letting the user choose how much content is on the screen, but it’s still a big increase over the default. I uploaded the images to my Media on WordPress.com, and then used the custom design upgrade to add my own CSS to Michael’s Elegant Grunge CSS. Custom CSS is loaded after the default CSS, so you can add just the CSS you need to modify to get the look you want. A quick search through the provided CSS showed me the locations where the header, body and footer images were being used and where the widths for content were being set. After a few minutes I had the below CSS in my Custom Design CSS window. I left the default of “Add my CSS to Elegant Grunge’s CSS stylesheet” checked and used 810 in the “Limit width to pixels for videos, full size images, and other shortcodes.”

Here are the six images that I modified: cac-header.png, cac-header-no-sidebar.png, cac-body.png, cac-body-no-sidebar.png, cac-footer.png, and cac-footer-no-sidebar.png. If you’d like to use this, please click each link, and then right click each image and save it to your computer. Then upload each image into your Media library on WordPress. Once you’ve done that you can click on each image name in the Media Library and you’ll see the URL for the image. Plug that URL into the code below, replacing each PUT-YOUR-MEDIA-LIBRARY-URL-HERE with the base portion of your URL. For instance if your media library URL for the cac-body.png is https://carsandcode.com/wp-content/uploads/2011/08/cac-body.png then you would update the second line below to background:url(‘https://carsandcode.com/wp-content/uploads/2011/08/cac-header.png&#8217;) no-repeat center;.

#header {
background:url('http://PUT-YOUR-MEDIA-LIBRARY-URL-HERE/cac-header.png') no-repeat center;
}
.no-sidebar #header {
background-image:url('http://PUT-YOUR-LIBRARY-MEDIA-URL-HERE/cac-header-no-sidebar.png');
}
#content-container {
background:url('http://PUT-YOUR-MEDIA-LIBRARY-URL-HERE/cac-body.png') center top repeat-y;
}
.no-sidebar #content-container {
background-image:url('http://PUT-YOUR-MEDIA-LIBRARY-URL-HERE/2011/08/cac-body-no-sidebar.png');
}
#content {
width:1150px;
}
#content-body {
width:810px;
}
.no-sidebar #content-body {
width:950px;
}
.post .entry {
line-height:1.5em;
}
#sidebar {
left:10px;
width:220px;
}
#footer-wrap {
background:url('http://PUT-YOUR-MEDIA-LIBRARY-URL-HERE/cac-footer.png') no-repeat center top;
}
.no-sidebar #footer-wrap {
background-image:url('http://PUT-YOUR-MEDIA-LIBRARY-URL-HERE/cac-footer-no-sidebar.png');
}
h1.entry-title,h2.entry-title {
width:700px;
}

After using the modified images and CSS, I get this:

Quick Specs (all measurements in pixels):

  1. One sidebar: main column width is 810, sidebar width is 220.
  2. No sidebar: main column width is 950.

What do you think? Is this better? Is anyone having issues now that the width is wider? Leave some feedback and let me know. Also, I know that these CSS and image modifications are not perfect. If someone else can come up with better numbers and/or images, please share and I’ll update the post.

P.S. This site is best viewed at 1280 (or wider)  x 1024 (or any other height you desire!) 😉

Edit: Added a line to increase the line-height after a suggestion by Designsimply on the WordPress forums. Also added some clarifying information about the theme options and why I chose the width I did.

Expert Oracle Application Express

Expert Oracle Application ExpressOne of the fundamental problems with most documentation from most technology companies is that the documentation usually contains a bunch of assumed knowledge.

Take for example, the Oracle Application Express Installation Guide for Release 4.1. This document has the following line in Section 1.4 About Choosing an HTTP server. “In order to run, Oracle Application Express must have access to Oracle Application Express Listener, Oracle HTTP Server and mod_plsql or the embedded PL/SQL gateway.” Yep. That’s right… sort of. As an experienced installer of APEX, I know that they mean: There are three different ways to connect to Oracle Application Express:

  1. The Oracle Application Express Listener
  2. An Oracle HTTP Server and mod_plsql
  3. The embedded PL/SQL gateway

But, if I was a brand new person with no experience, I might wonder if I need the Oracle Application Express Listener + an Oracle HTTP Server + mod_plsql, or the embedded PL/SQL gateway. Reading the rest of the guide might give me an idea, but for a while I might be confused.

However, I often waffle back and forth between what the biggest problem with technology documentation is: Is it assumed knowledge? Or is it the fact that almost all technology documentation tells you what some setting or button does, but it almost always leaves out the ‘and here is why you would want to do this’ information. You could make the argument that they are one in the same, but I usually see them as different problems. The second problem really comes into play when there are choices. If there are no choices then just telling me what I have to do is fine. Just make sure I know how to do it. I once saw a step in an installation guide that was “Configure SQL/Net”. No links to other documentation. No explanation on how to do it. Just “Configure SQL/Net”. Ummm… Aren’t you kind of assuming that I know how to do that? (And lest it seem like I’m picking on Oracle here, I’ve seen this in all types of documentation from other technology companies like Microsoft and Dell to even simple things like power tools.) But when I have choices, let me know what those choices mean to me and why I’d choose one over the other.

While it would be great if all the documentation from technology vendors addressed both problems, I doubt it will happen soon. Until then we have books like Expert Oracle Application Express.

This book is 13 chapters long and each chapter was written by a different author. At first that sounds like a recipe for disaster. But when you realize that each author is a pillar of the APEX community and a subject matter expert on their chapter and (most importantly) each of the chapters is excellent, you suddenly realize you’re holding a treasure in your hands.

Each chapter contains real world experience including the all important ‘and here is why you would want to do this’. If fact chapter 1 by John Scott addresses the above connection to Oracle Application Express issue. Sure there are three ways to do it, but why would I want to use one way or the other? Well, read chapter 1 and you will know.

I spent 14 years at Oracle and taught hundreds of people how to use Oracle Application Express and I thought at least some of the chapters would be a bit of a review for me, but I can truly say that I learned valuable information from each and every chapter.

I highly recommend this book to anyone who is going to be using Oracle Application Express.